How to Upload Already Run R Notebook on Github
Git, GitHub and RMarkdown
Learning outcomes
By the finish of this practical yous should exist able to:
- Explicate the utilize of and differences betwixt Git and GitHub
- Create reproducible and open up R lawmaking
- Produce RMarkdown documents that explicate code and analysis
Homework
Outside of our scheduled sessions you should be doing effectually 12 hours of extra report per week. Feel free to follow your own GIS interests, simply proficient places to start include the following:
Exam Each week we will provide a short job to test your knowledge, these should be used to guide your study for the final examination.
The task this week is to:
- Read in global gender inequality data
- Join the global gender inequality index to spatial information of the World, creating a new column of deviation in inequality between 2010 and 2019
- Share it with the World on GitHub
- Add yous repository URL to the circulated spreadsheet
Recommended listening 🎧
Some of these practicals are long, take regular breaks and have a listen to some of our fav tunes each week.
Andy Beautiful people will ruin your life! One of my favorite bands…the Wombats. Formed in 2003 at the Liverpool institute of performing arts. Merely really talented musicians.
Adam What happens when two of the greatest MCs ever to pick upwards a mic get together to make some music? They only smash out a double album with some of the biggest producers in drum & bass and absolutely kill it! Yep, known to their mums as Delroy and Dominic, to the residuum of us every bit DRS and Dynamite, it's but Playing in the Dark by DRS and Dynamite!
Introduction
In this practical you volition learn how to produce work that is open, reproducible, shareable and portable using RStudio, RMarkdown, Git and GitHub. As more and more researchers and organisations publish assocaited code with their manusripts or documents information technology's very imporant to get adept at using these tools.
The tools y'all volition use are:
-
RStudio is a graphical user interface (that you should already be familiar with) — it contains a number of features which make it excellent for authoring reproducible and open geographic data science work.
-
RMarkdown is a version of the Markdown markup language which enables plainly text to exist formatted to comprise links to data, code to run, text to explain what yous a producing and metadata to tell your software what kinds of outputs to generate from your markdown code. For more data on RMarkdown look here.
-
Git is a software version control system which allows you to proceed rail of the code you produce and the changes that y'all or others make to it.
-
GitHub is an online repository that allows anyone to view the lawmaking you have produced (in whatever language you choose to programme in) and utilise/scrutinise/contribute to/comment on it.
Git and GitHub
The three ways
In that location are three ways to brand your RStudio projection piece of work with GitHub
- Set the GitHub repository, clone it to your Git and so load information technology in RStudio — using Git GUI
- Create a new RStudio project and link it to GitHub — new version control
- If you lot have an existing RProject and so y'all can link them manually — existing project
I volition show you all three, you lot should be able to practise way ane, then mode 2 using the aforementioned repository. Way 3 will have merge bug, so start with a fresh GitHub repository. Information technology is useful if you have produced some code and so want to share it at a later date. Follow what i do in the lecture.
My communication is to read the Git and GitHub parts of the practical earlier you start (until the RMarkdown department).
Set your GitHub
-
If you are working on your own figurer, you will starting time need to install Git — https://git-scm.com/ — if you are working on the UCL Remote Desktop, you lot won't need to do this every bit it is already installed for you.
-
Become to http://github.com, create an account and create a new repository (telephone call it anything you like - 'gis_code' or something similar), making sure it is public and yous cheque the box that says 'initialise new repository with a README' — click 'create repository' at the bottom
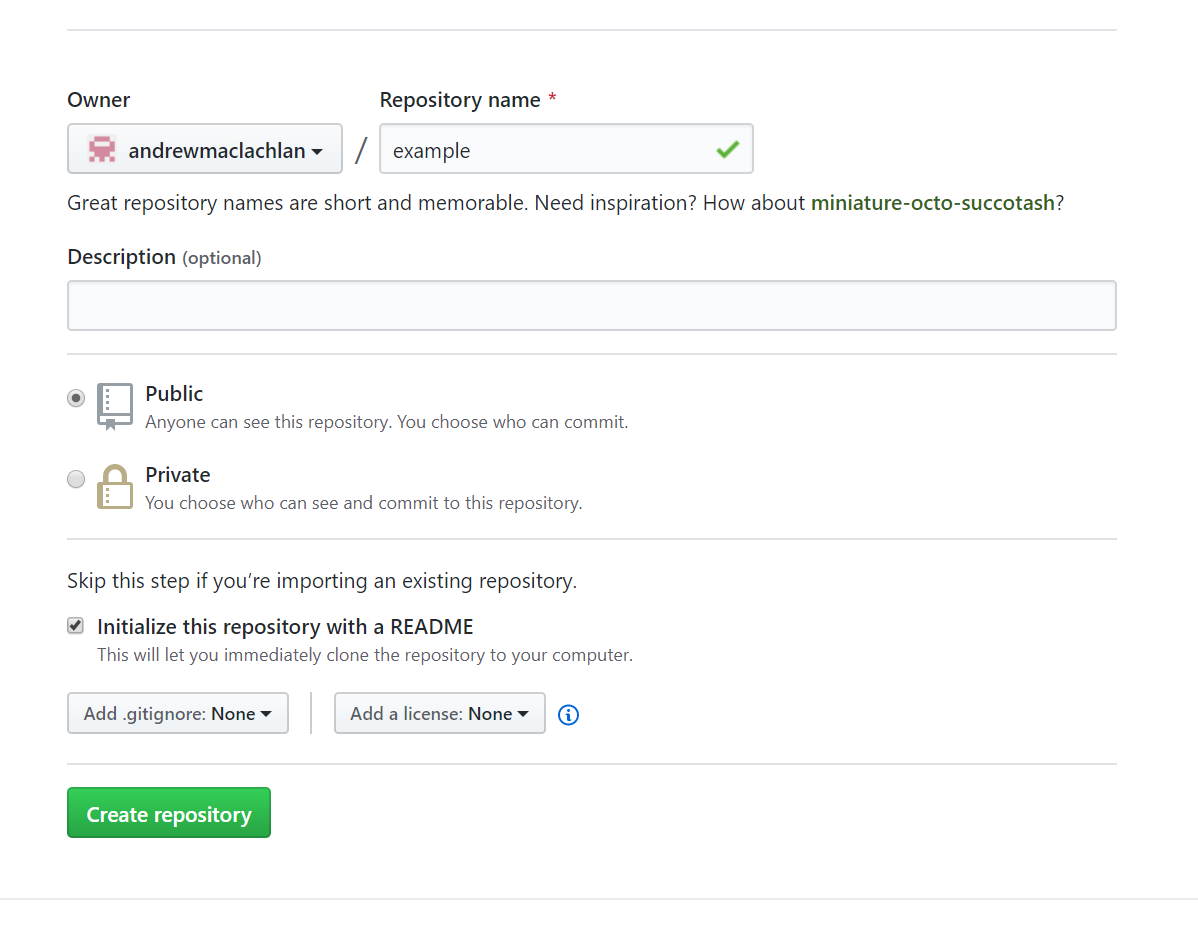
- Your new repository ('repo') volition be created and this is where you will be able to store your code online. Y'all will detect that a README.doc markdown file has also been created. This tin can be edited to tell people what they are likely to detect in this repository.
Using RStudio with Git
In summer 2021 GitHub changed it's hallmark process to a token based arrangement as opposed to a countersign based arrangement. David Keys provided an excellent overview with some videos that documented this change and how to now set things upward, which i take adapted here
Bank check Git is installed
In the console window y'all will come across a terminal tab, bank check Git is installed with which git and then git --version you should become a bulletin in response that says where your git installation is and the version you take.
Configure your Git
You need to tell Git who you are and your GitHub username. The easiest style is to employ the usethis package, you will need to install and library it.
Then, in the panel, type the function edit_git_config()
A Git config will load and you lot demand to modify your name and email to friction match GitHub.
Start your Git
To start Git y'all need to be in a RStudio project. Instructions beneath prove yous how to practice this in various scenarios. For instance, in the starting time Git way, we clone (copy) a remote repository (of our ain) so if we wanted to brand changes (to the remote) nosotros would need to follow these instructions to link our Git to GitHub
In the first case we just copy information technology from the remote (GitHub), that will have git ready to go - so don't do this now….but a very simple way is to again load the usethis package in the console and the office use_git(), then blazon selection one. Yous would do this for a project that you have started, which doesn't accept git enabled.
Connect Git to GitHub
Once we take an RStudio projection with Git, either making information technology oursevles or downloading one from GitHub, we need to connect it to GitHub.
From GitHub yous need to generate a personal access token. Yous tin can use the function create_github_token() from the usethis bundle or too through GitHub > settings > Developer settings > personal access tokens > generate new token.
Use a descriptive proper name and consider saving the token - it won't salve on GitHub
The last step is to shop this token in Git with the gitcreds packet > install and load it > then employ the office gitcreds_set() > re-create your token in.
Using the Git GUI - mode one
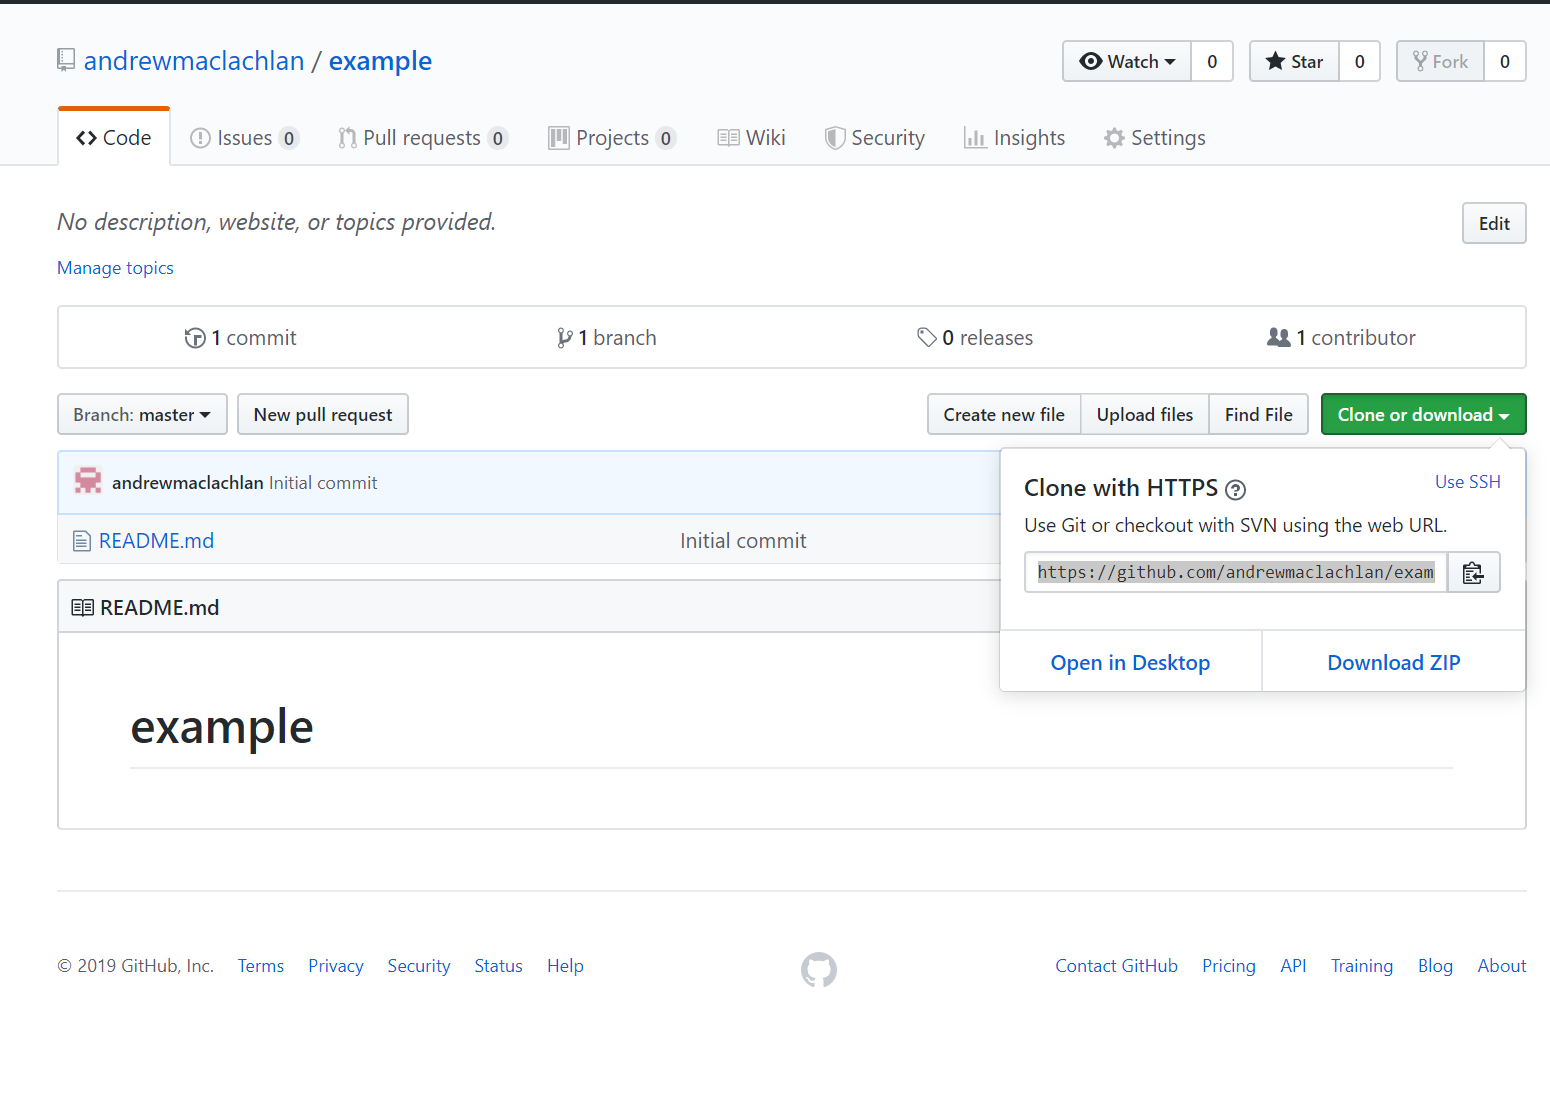
- At present you have created your repo online, you demand to 'clone' it so that there is an identical copy of it in a local folder on your computer.
There are a couple of ways of doing this, but the piece of cake ane is to utilize the GUI that comes packaged with your git installation.
- The beginning matter you need to do is re-create the Clone URL for your repo from the github website — click the green button in your repo for 'Clone or Download' and copy the link:
-
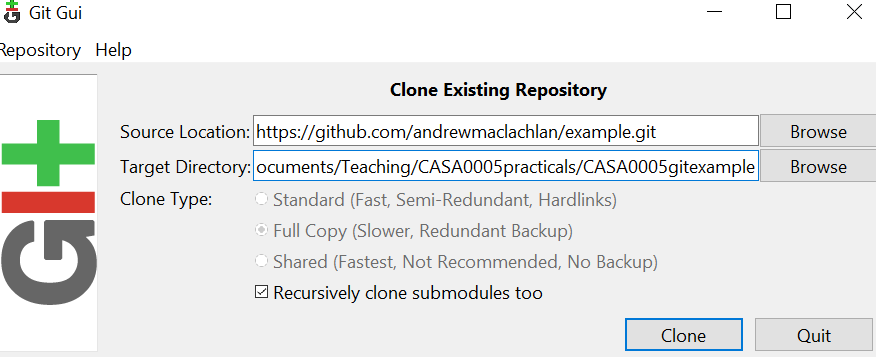
Now in the windows start carte, go to Git > GUI
-
Select 'Clone Existing Repository' and paste the link from your GitHub business relationship into the meridian box and the local directory that yous desire to create to store your repo in the bottom box (note, y'all volition demand to add together a name for a new folder, once you accept selected an existing directory, don't create a new folder in windows explorer you have to specify it in the file path).
-
Later on a few moments, you should now be able to view a copy of your GitHub repo on your local machine. This is where you will be able to store all of your lawmaking and some other files for your reproducible enquiry.
-
Open RStudio and go File > New Project > Existing Directory
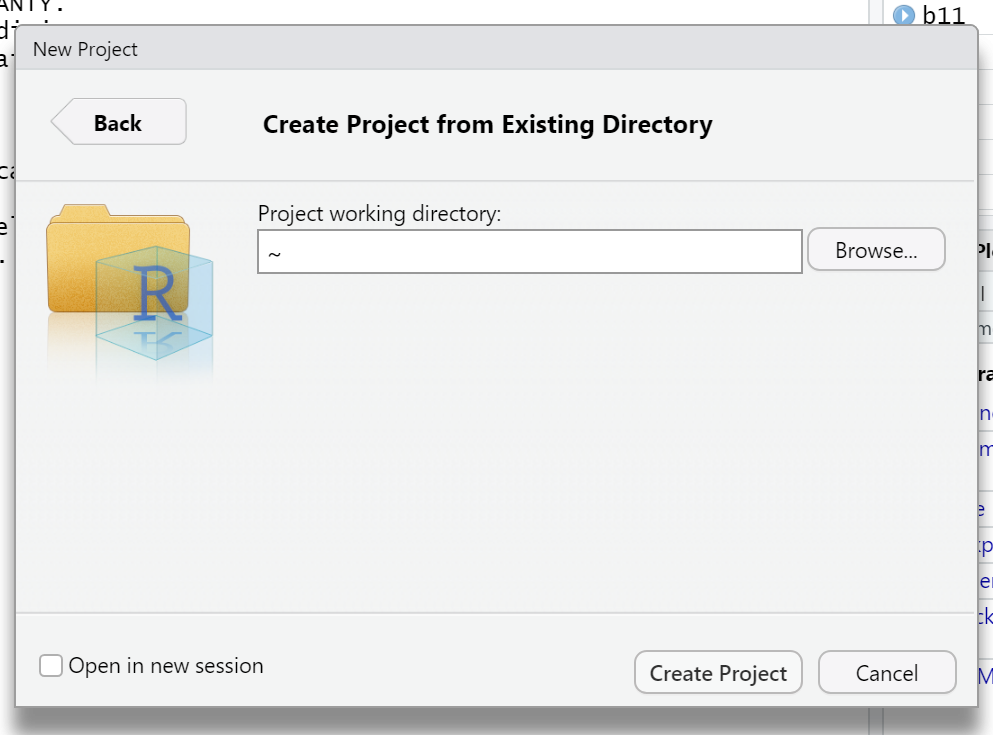
- Set the project working directory to what you specified in the Git GUI target directory. You have now linked your projection to your local Git
Note for afterwards, when nosotros attempt to push button to GitHub from RStudio the push button might be geyed out..this is most probable due to your local Git branch not tracking (following) the GitHub branch! I show you how to fix this in the greyed out push button section.
Create a new version control in RStudio - fashion 2
There is an easier way to set up Git and GitHub with your project, simply this assumes you are starting fresh (with no code in an RProject)!
-
Under Gear up upwardly your GitHub we fabricated a repository on GitHub. Re-create that URL.
-
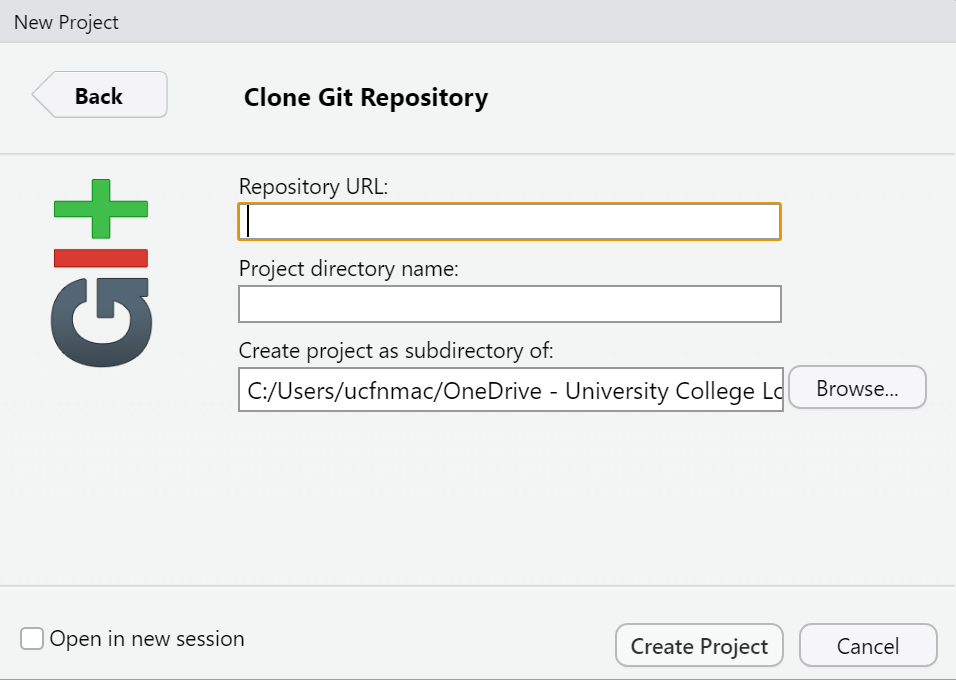
Open RStudio > File New Project > Version Control > Git
-
Re-create in the repository URL and provide a projection directory proper noun…only it should populate when yous paste in the URL
If take take an existing project - way iii
-
Open RStudio and your existing project (or make a new one…i will make i here). In RStudio Tools > Global Options, nether 'Git/SVN' bank check the box to allow version control and locate the folder on your computer where the git.exe file is located — if you lot take installed git then this should be automatically in that location. If you make a new project make sure you create a file (
.Ror.Rmdthrough File > New File), add together something to it, then save it (File > Save Equally) into your project folder. When it saves it should apprear in the lesser correct Files window. -
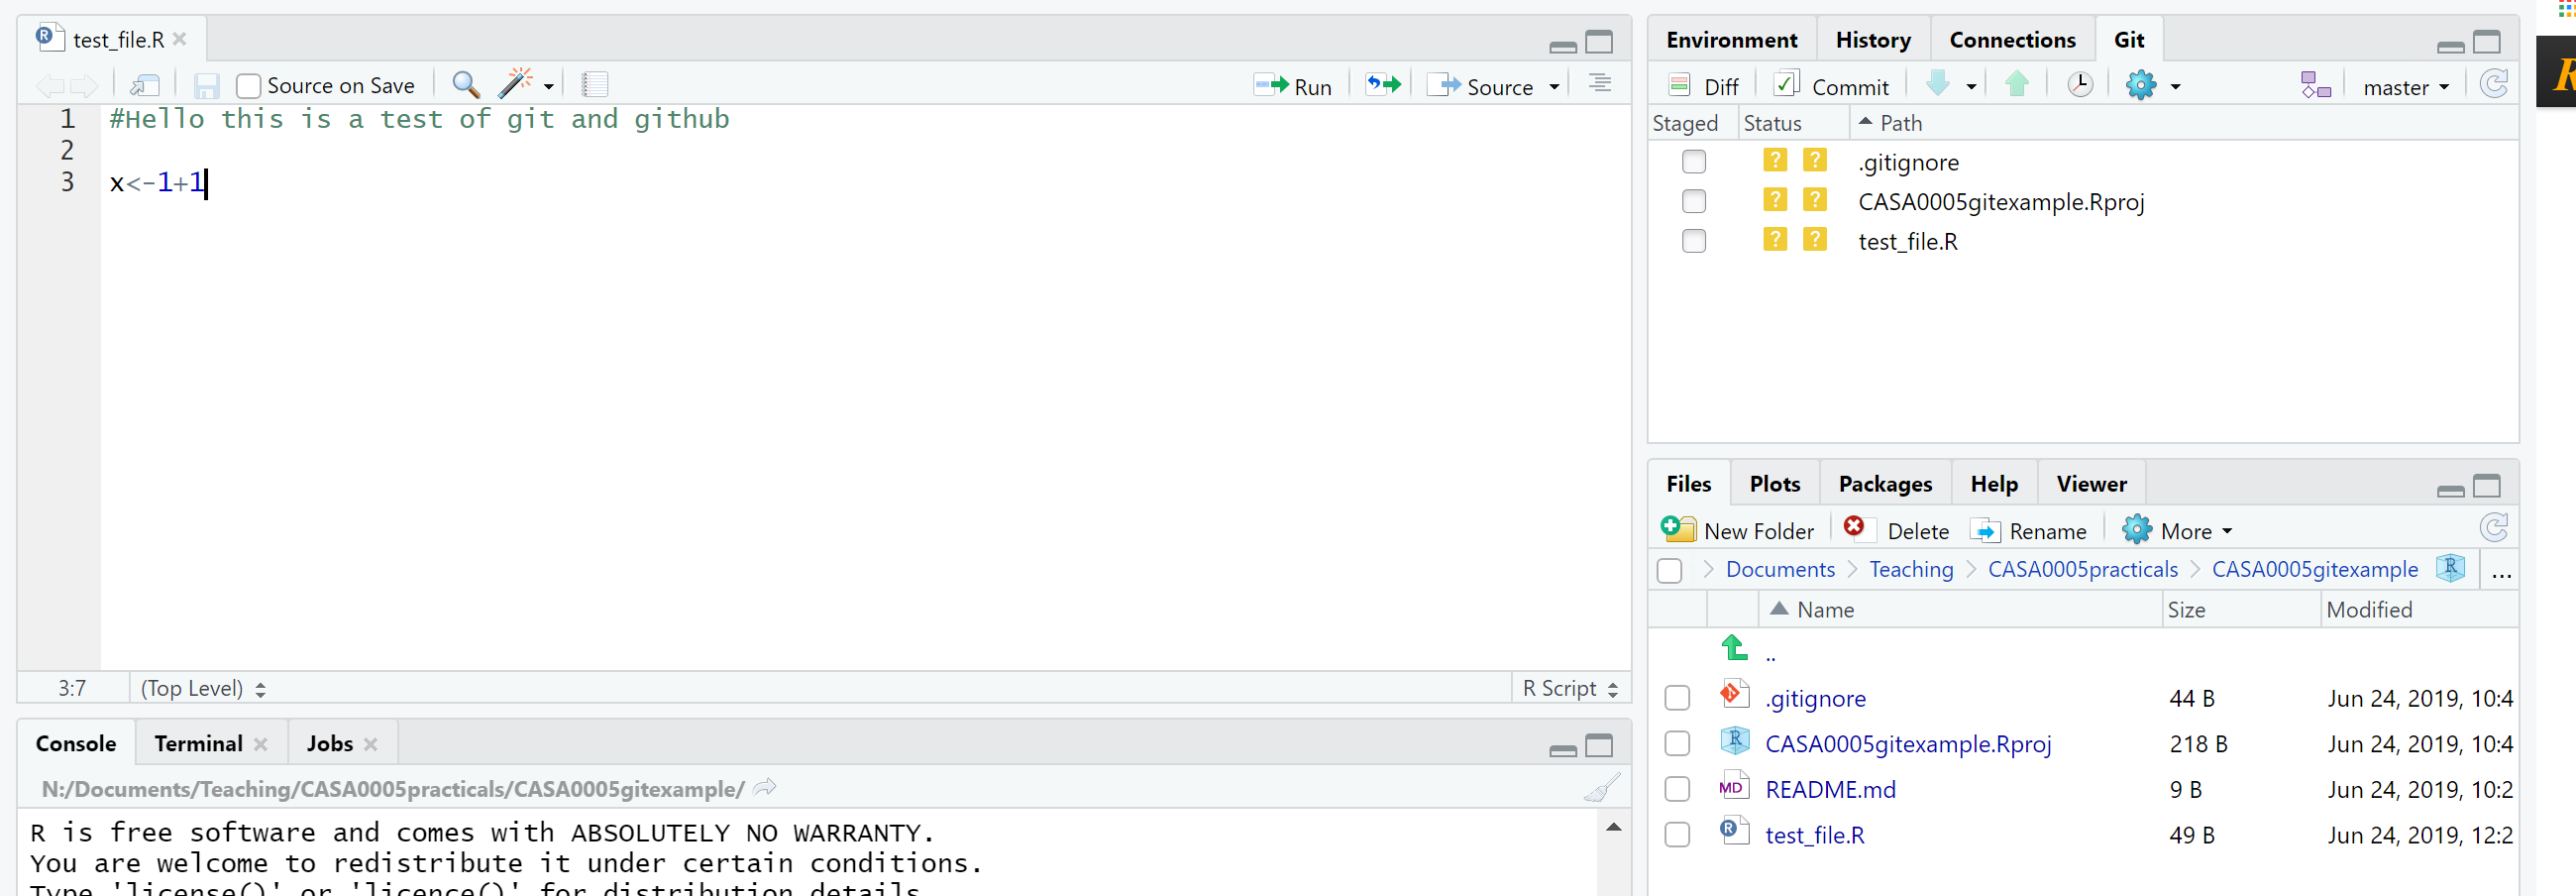
Adjacent go Tools > Projection Options > Git/SVN > and select the version control system equally Git. You should now see a git tab in the environment window of RStudio (tiptop right) and the files also appear under the Git tab. It should look something similar this….
Now yous will be able to use Git and GitHub as per the following instructions…
Commiting to Git
-
As well as saving (as you normally do with whatsoever file), which saves a re-create to our local directory, we will also 'commit' or create a salvage bespeak for our work on git.
-
To do this, yous should click the 'Git' icon and up will pop a menu like the one below:
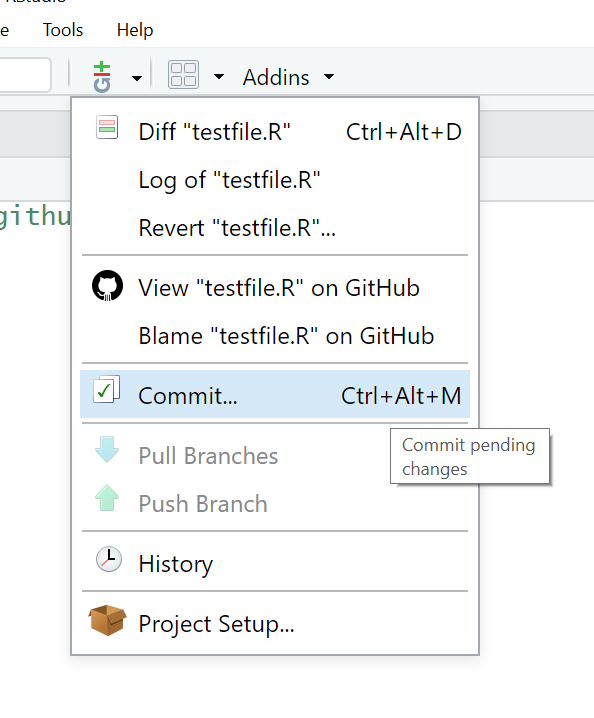
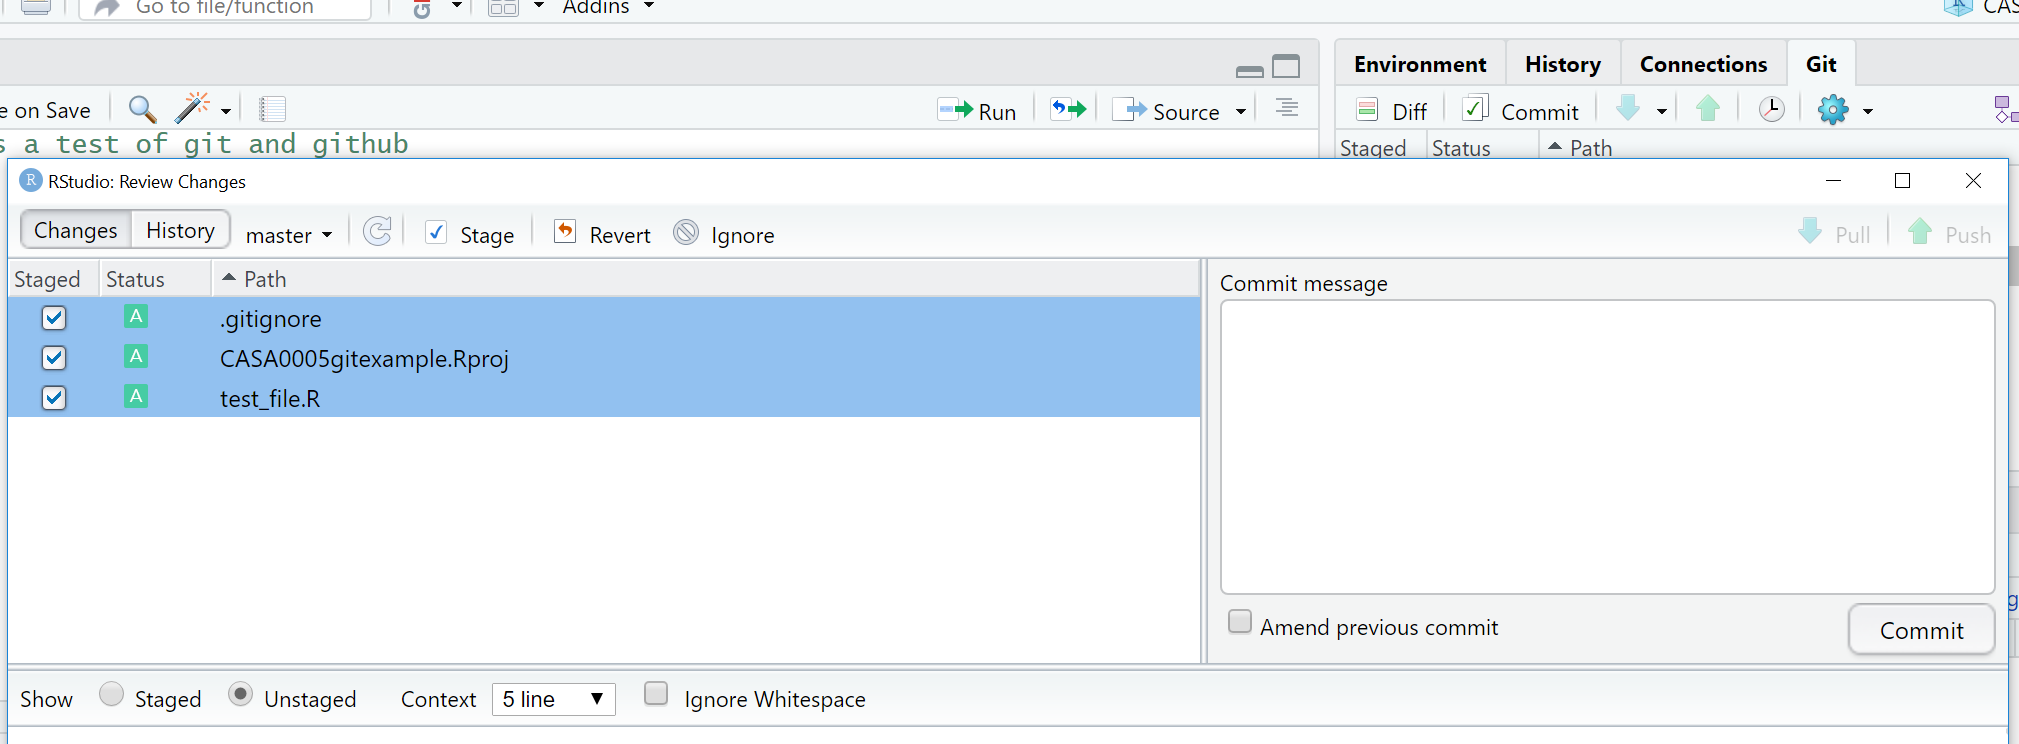
You tin can as well click the Git tab that will have appeared in the height-right window of RStudio. Upwardly will and so pop another window that looks a little like the one below:
-
Stage the changes, add a commit message then y'all tin monitor the changes yous brand, then click commit
-
Make some more than changes to your file and save information technology. Click commit again then in the review changes box yous will be able to run into what has changed within your file. Add a commit message and click commit:

Push to Github
We need to create a new GitHub repo for our local project. Luckily the usethis package can exercise this for us. Merely type the role use_github() in the console and a new GitHub repo will appear using the proper name of your projection!
Now we tin can push button our changes to GitHub using the upwards arrow either in the RStudio Git tab (environment quadrant), or from the review changes box (opens when you click commit).
But….if the push button is greyed out go to the section Greyed out push
Pull from GitHub
-
Pull will have any changes to the global repo and bring them into your local repo. Get to your example GitHub repo (online) and click on your test file > edit this file.
-
Add a line of lawmaking or a comment, preview the changes then commit straight to the chief branch.

- Now in RStudio click the downwardly pointer (Pull) request. Your file should update in RStudio. If y'all were to update your file on GitHub and your local 1 in RStudio separately you would receive an fault message in RStudio when you attempted to commit.
Using Git outside RStudio
Sometimes RStudio Git can be a bit temperamental. For example, when staging the files they tin have some time to appear with the ticked box (I recollect this is because we are working from the Network). Normally in RStudio you click the commit button, select to phase all the files, await a few seconds then close the review changes box and commit from the buttons in the Git tab in the environment quadrant.
Alternatively if you would similar to employ Git but y'all're working on the UCL Remote Desktop or you are experiening other problems with getting git working in RStudio, fear not, you lot tin just use your raw Git installation.
-
In the Showtime Menu, open the git GUI. Start > Git > Git GUI. Yous should open the existing repository that you accept just created.
-
Whenever you lot have made some changes to your files in your cloned repo, y'all can use git to review the changes and 'Commit' (salve) them and then 'Button' them upwardly to your primary repository on GitHub.
-
To review and commit your changes, in the commit menu, simply:
- browse for changes
- phase them prepare for committing
- commit the changes
- push the changes to your GitHub repo
Troubleshooting
Were y'all challenged for your countersign?
As of Jan 2019 information technology is possible that Git will use a credential helper provided by the operating system. Still, as of summer 2021 the token system has replaced this, so this is very unlikely.
You can however set your username and email manually using the git prompt.
Go Tools > Shell and enter:
git config --global user.proper name 'yourGitHubUsername' git config --global user.e-mail 'name@provider.com' These only need to be set one time.
Fork a repository
A Fork in GitHub is a copy of someone else's repository to your own GitHub account. You could use it as a base of operations starting betoken for your project or to make a set and so submit a pull request to the original owner who would then pull your changes to their repository.
- You lot can fork a GitHub example repository from: https://github.com/octocat/Spoon-Knife
In one case you fork it, you should see information technology in your repositories
Branches
Each repository you make in git has a default branch just you can create new branches to isolate development of specific areas of work without affecting other branches — like a examination environment.
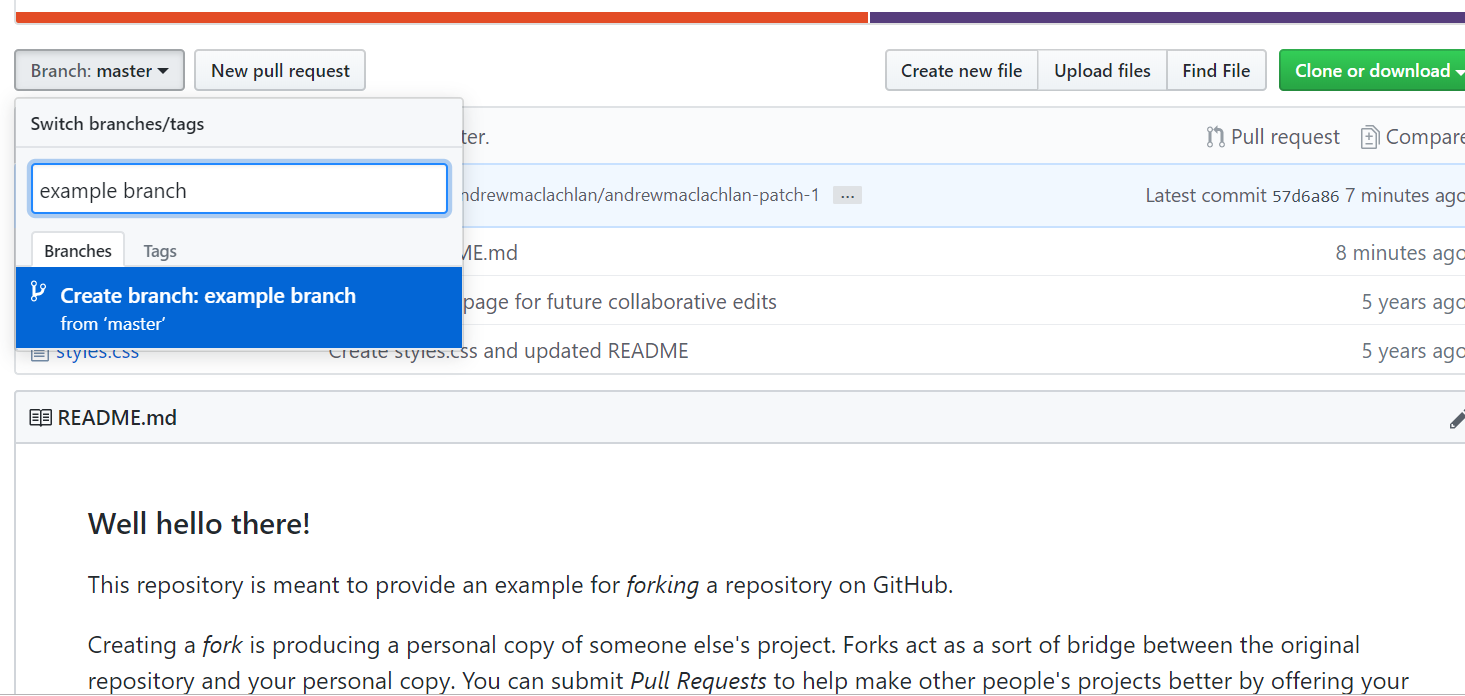
- Go to the test repository you just forked on github. Click the branch drib down and type in the proper noun for a new co-operative:
-
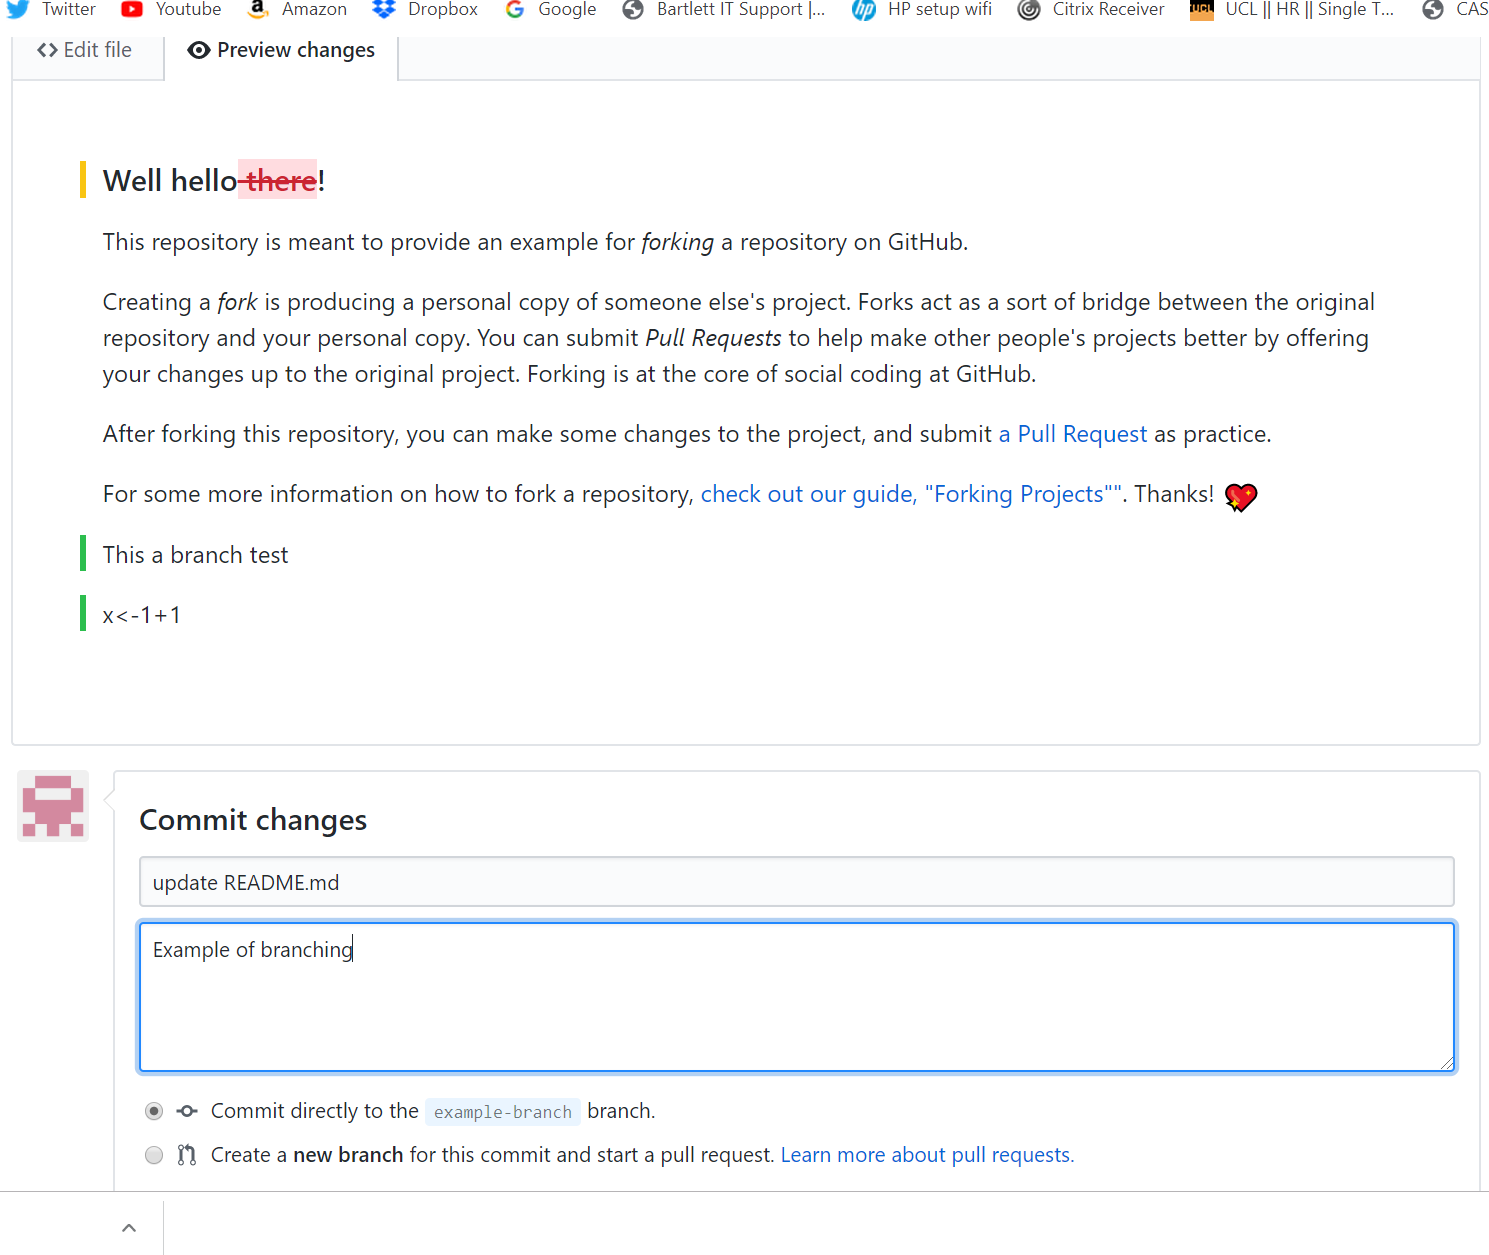
At present click on the README.md file > edit this file
-
Add some changes, preview them and consummate the commit changes box at the bottom of the screen.
-
Here, we're going to commit direct to the new co-operative. We could take made these changes to the primary co-operative and and so fabricated a new branch for them at this phase. Commit the changes.
-
Become to the dwelling house page of our case co-operative (click the co-operative down arrow and select your example co-operative). You'll see that our example co-operative is now 1 commit ahead of the main
Now let's create a pull request to the main branch. If you had modified someone else'southward code, then you lot would send a asking to them to pull in the changes. Here we are doing a pull request for ourselves — from our example branch to our chief.
-
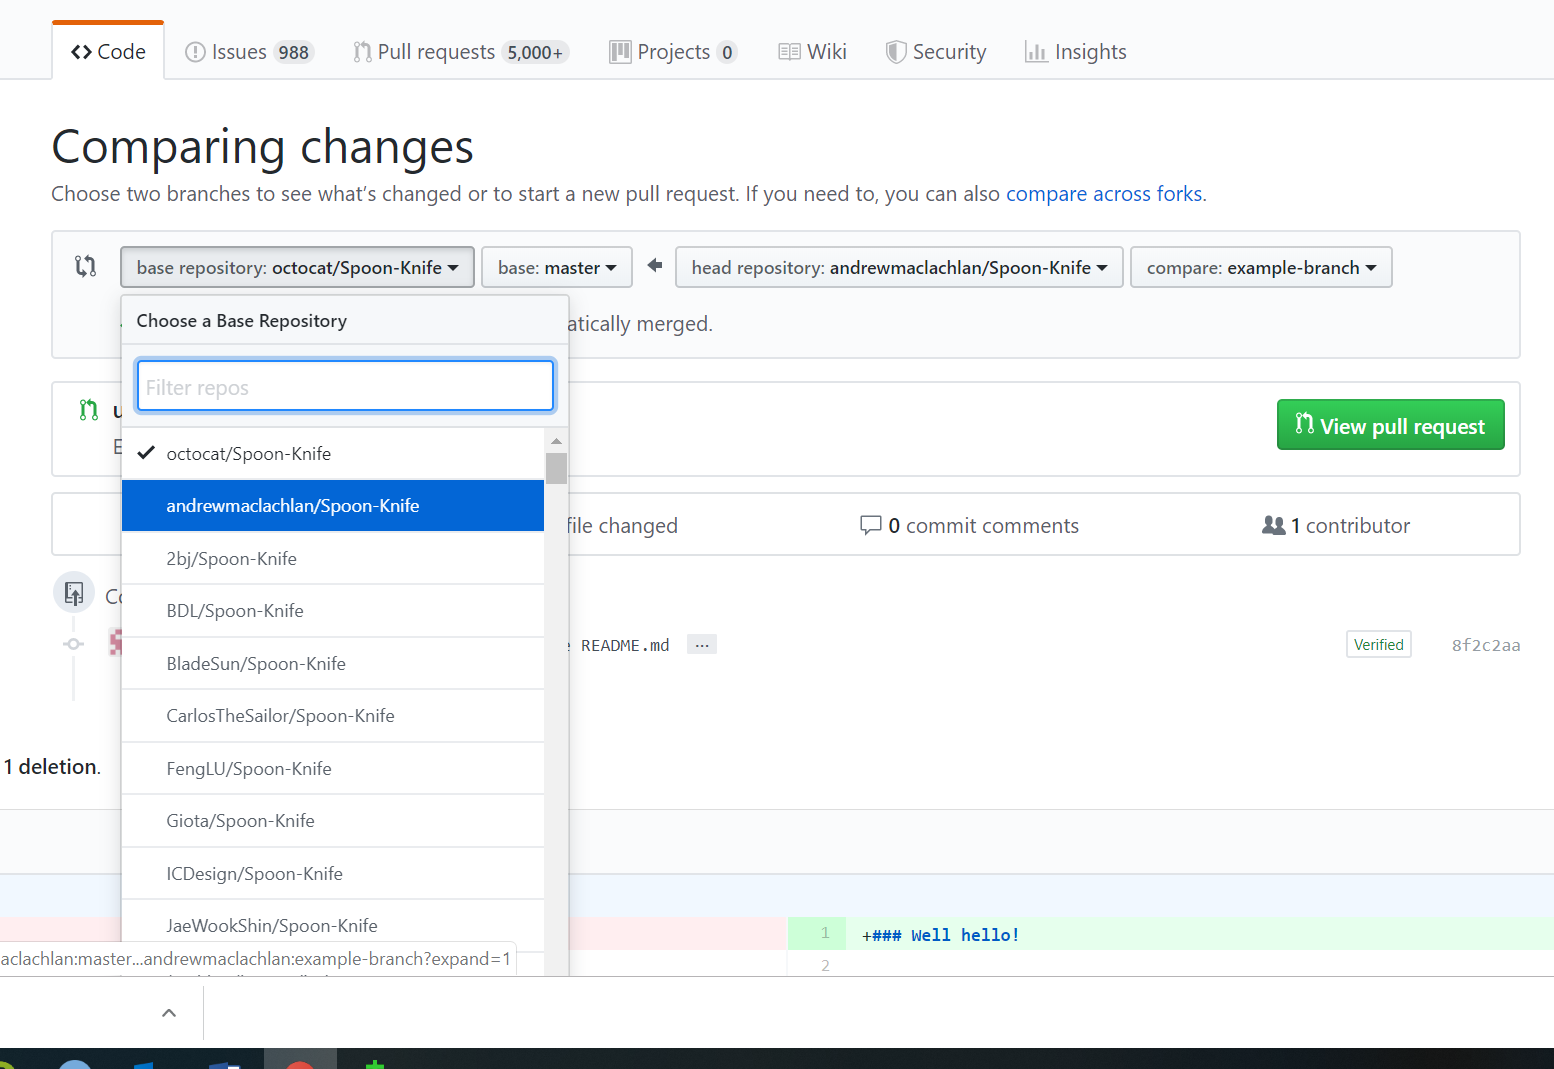
Click New pull asking.
-
At the top you volition see the branches that are existence compared — the base defaults to githubs example repository, alter information technology to yours.
-
Now roll downwardly and yous will run into the comparison of between the 2 branches. Click create pull request.
-
Select squash and merge > ostend squash and merge. This ways that all our commits on the exmaple branch and squashed into 1, every bit we just have i it doesn't matter only could exist useful in future.
-
Get dorsum to your main branch repository and you should meet the changes from the example co-operative have been merged.
We volition show yous how to publish RMarkdown documents online in a later practical.
Back in time
Git
Hither, we're going to use code seen in the section of existing project (way 3).
To quick recap here, i have an RProject with some files in, one of which is the test_file.R seen in the in the section of existing projection (mode 3).
We also added some lawmaking to this file in the section pulling from GitHub.
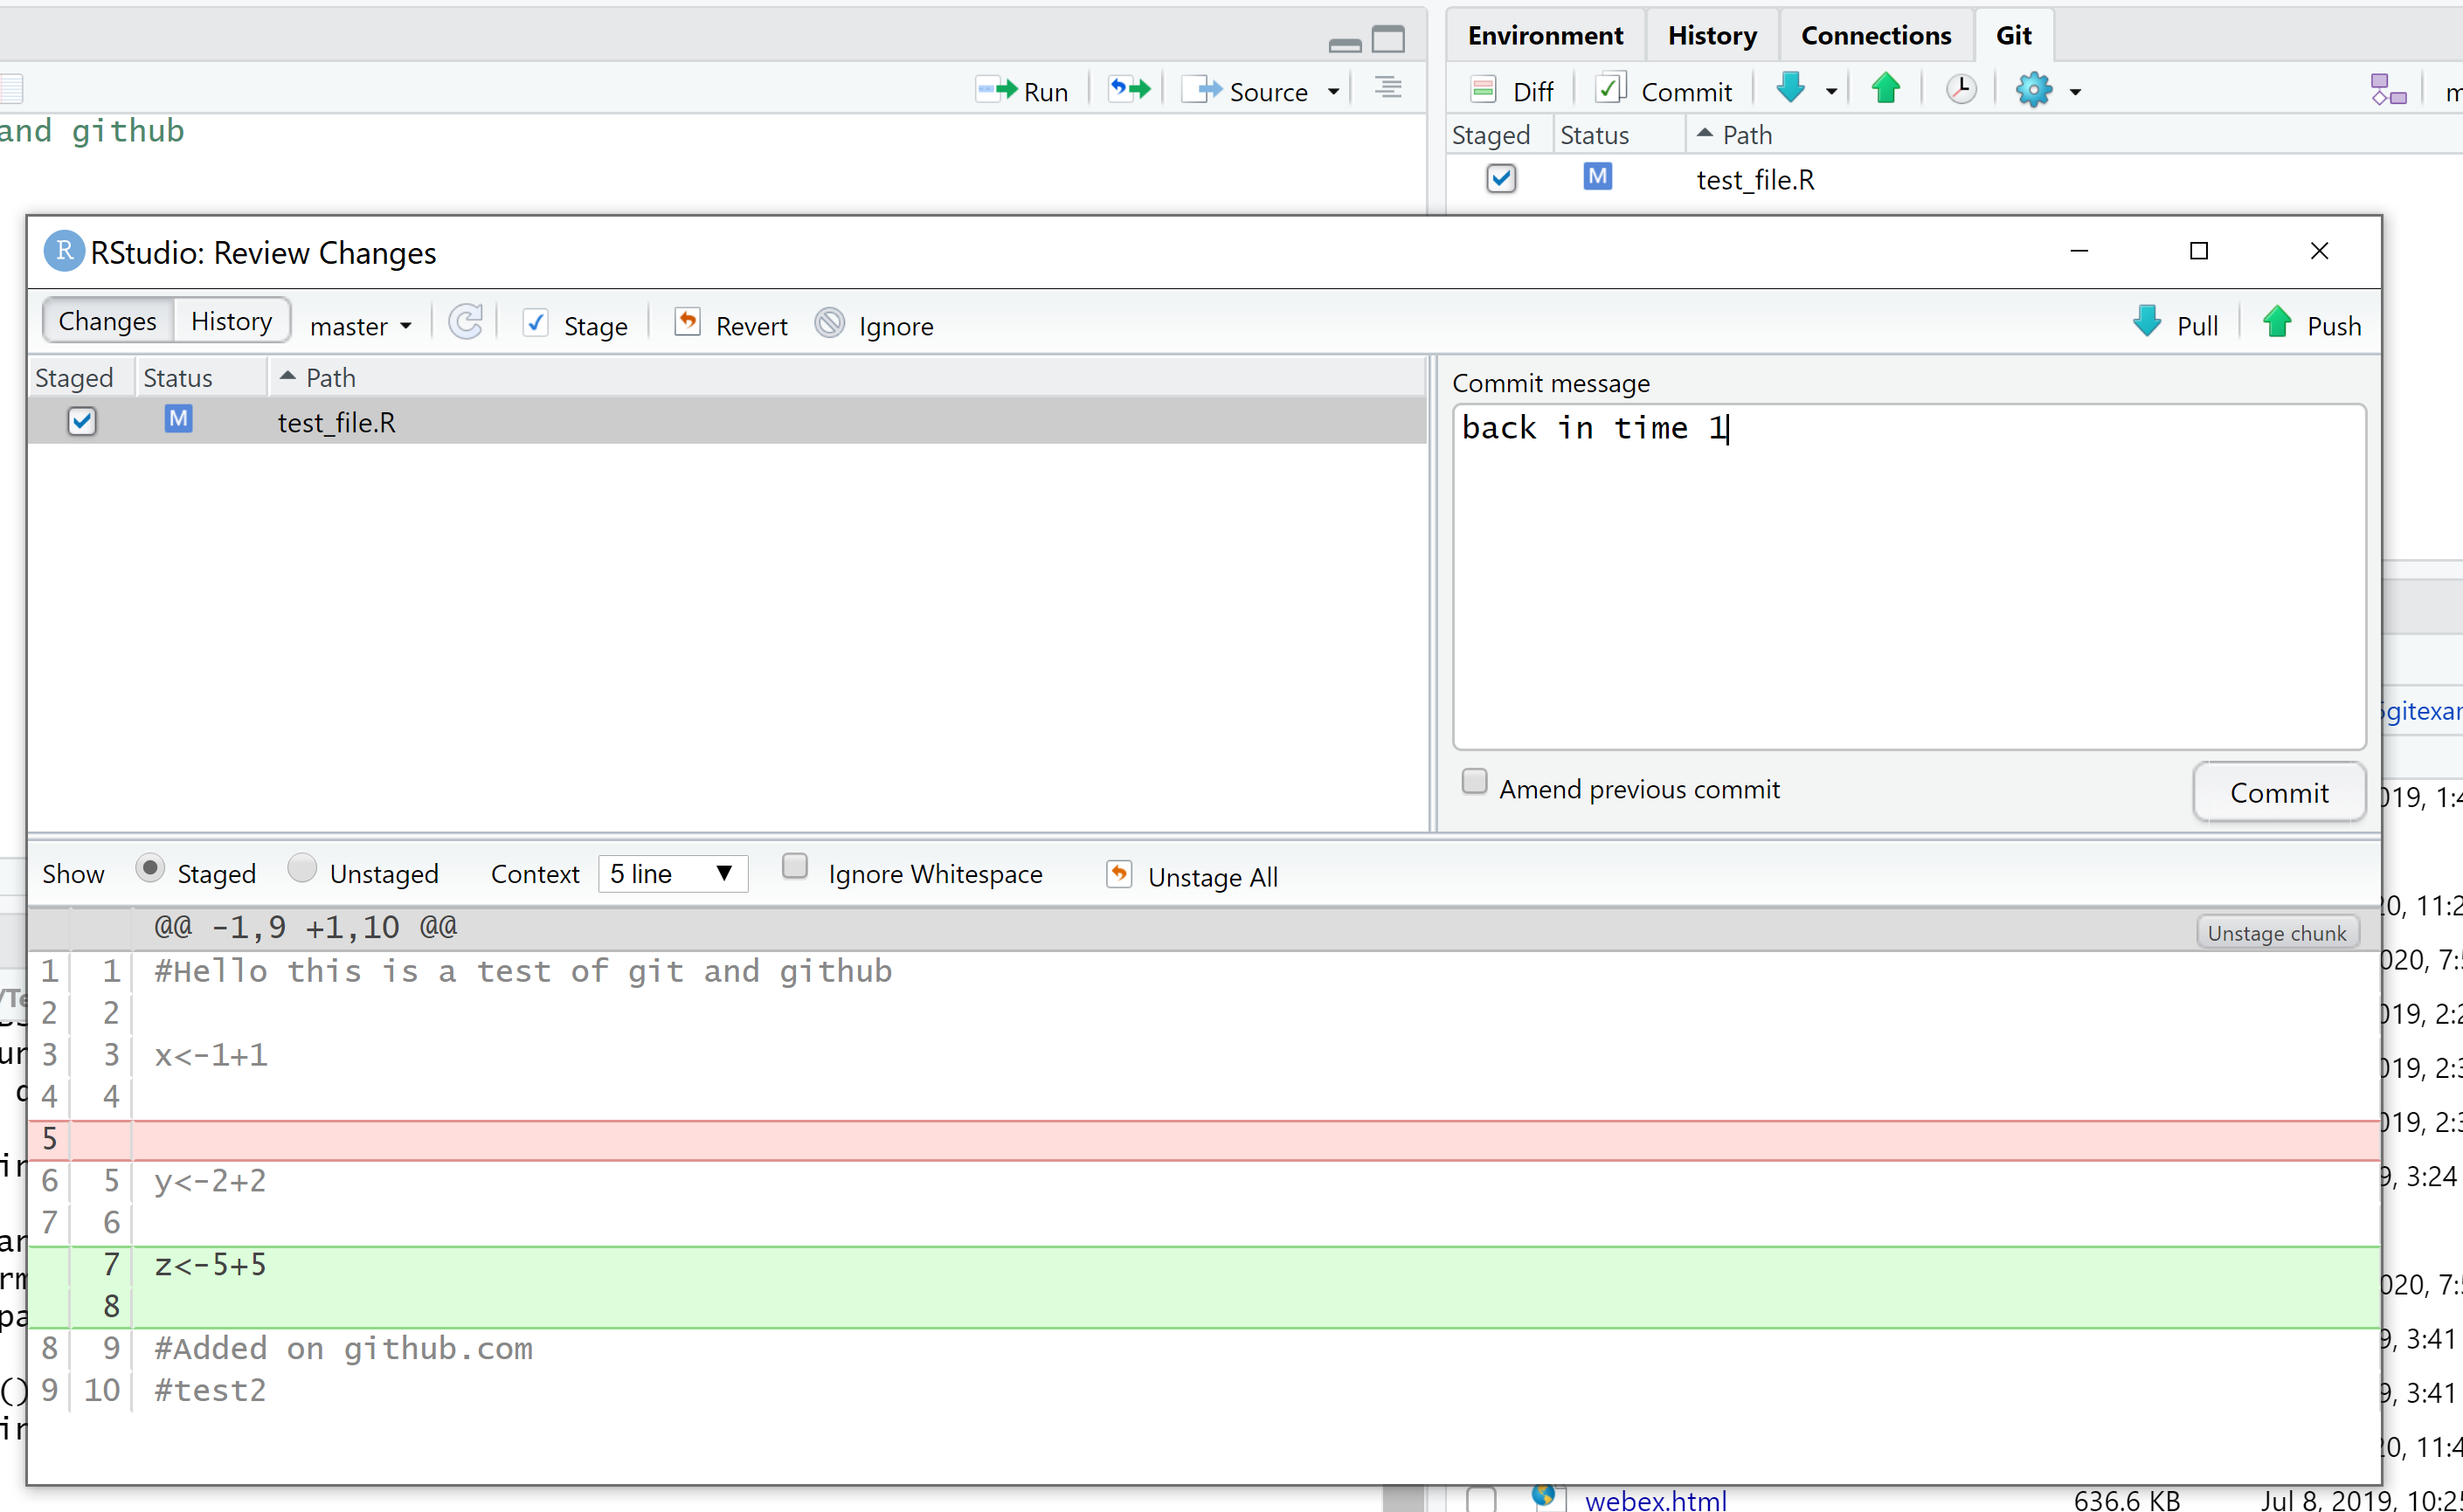
Now, nosotros are going to add some more lawmaking and then get back in fourth dimension to remove information technology. I've added z<-v+5 to my script and you lot can see the file has come up in the Git tab (also called the Git working directory) on the right manus side.

Now, as we have washed before, Commit(in the Git tab) then the review changes window comes up. Add together a commit message, click stage and the Commit. ** Don't button to GitHub yet**
But expect, you lot've just received an urgent electronic mail (probably using the loftier importance flag) that the variable z should exist deleted, renamed t and exist equal to ii. At present, of course, we could just rename information technology hither manually and Commit our changes. But what if you have a large project (like this book!) and make mistakes on several scripts or RMarkdown documents and you need to disengage them (similar the undo push button in Microsoft software). Here we are going to prove that.
To practise this we need to clearly know what we are trying to acheive, for u.s. it's easy, become dorsum ane commit.
We have to apply the beat out over again, click the cog icon and so trounce..
Now, there are 2 commands we can utilize hither git reset --difficult HEAD~one or git reset --soft HEAD~ane. These only tell Git to reset to Caput-1 commit (your current commit is the Head). Irresolute the number will alter how many commits you go dorsum. Hard will delete all the changes in the previous commit, soft will move the changes we committed to the Git tab, reversing out commit — always use soft!
Type the command git reset --soft HEAD~1, the press enter…
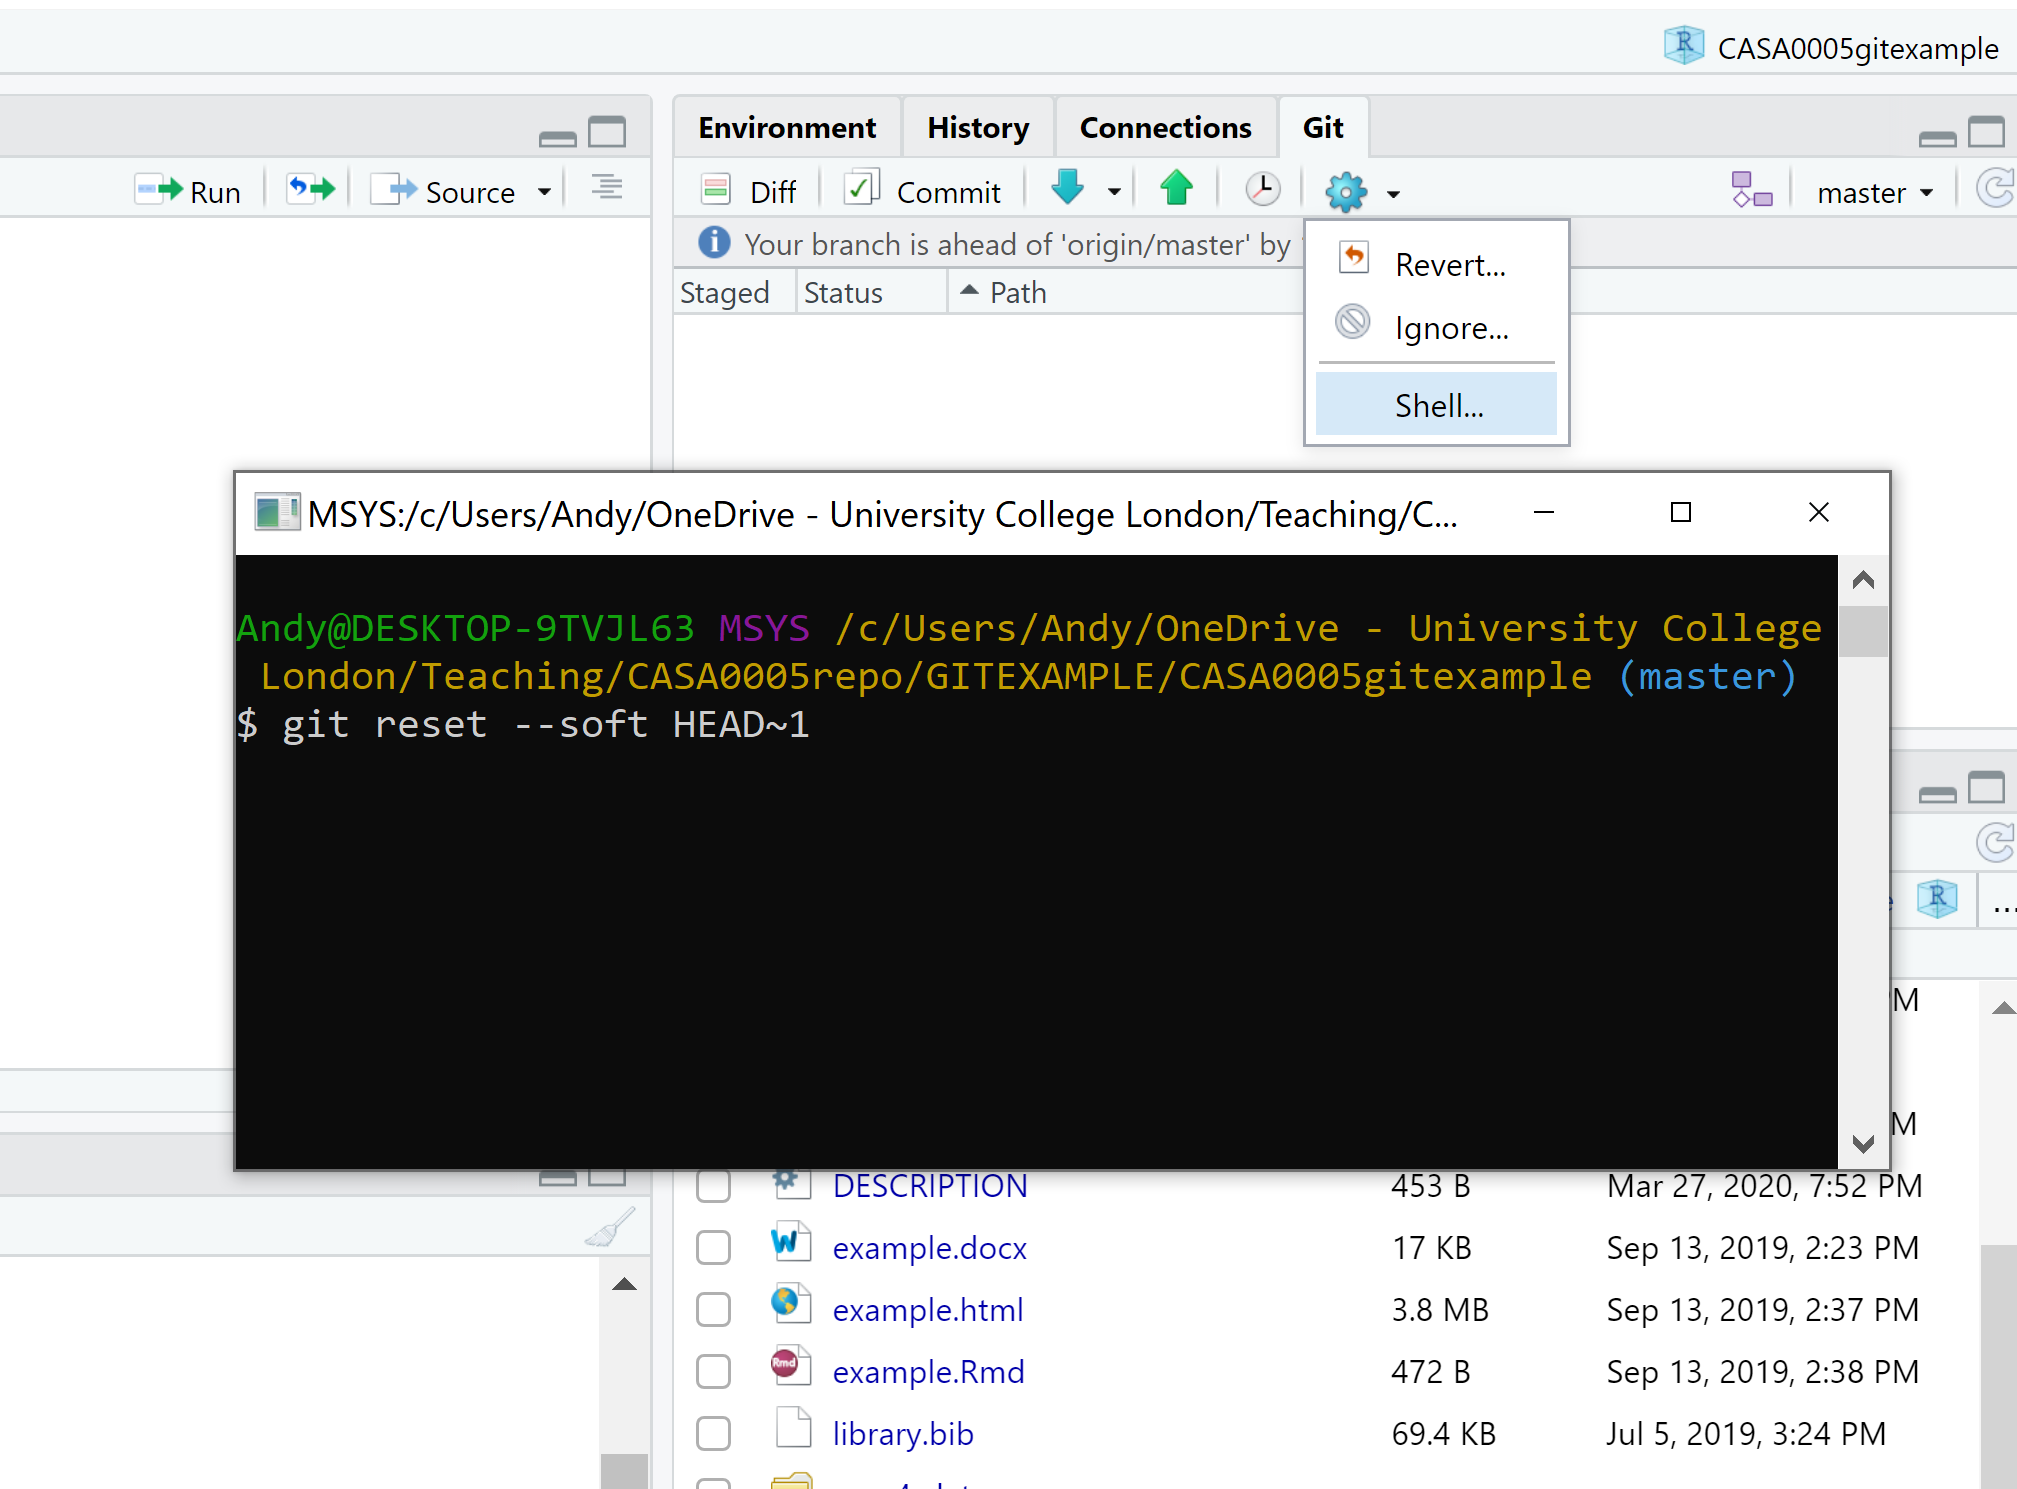
You'll see that the test_file.R has moved dorsum to the Git tab. At present if you take forgotten what changes you lot actually made in the final commit, click the Diff icon (next to Commit) and information technology will show the changes made to each file.
GitHub
This section follows on from what we've merely been through, even so, now will nosotros look at how to go back in time once you take pushed to GitHub
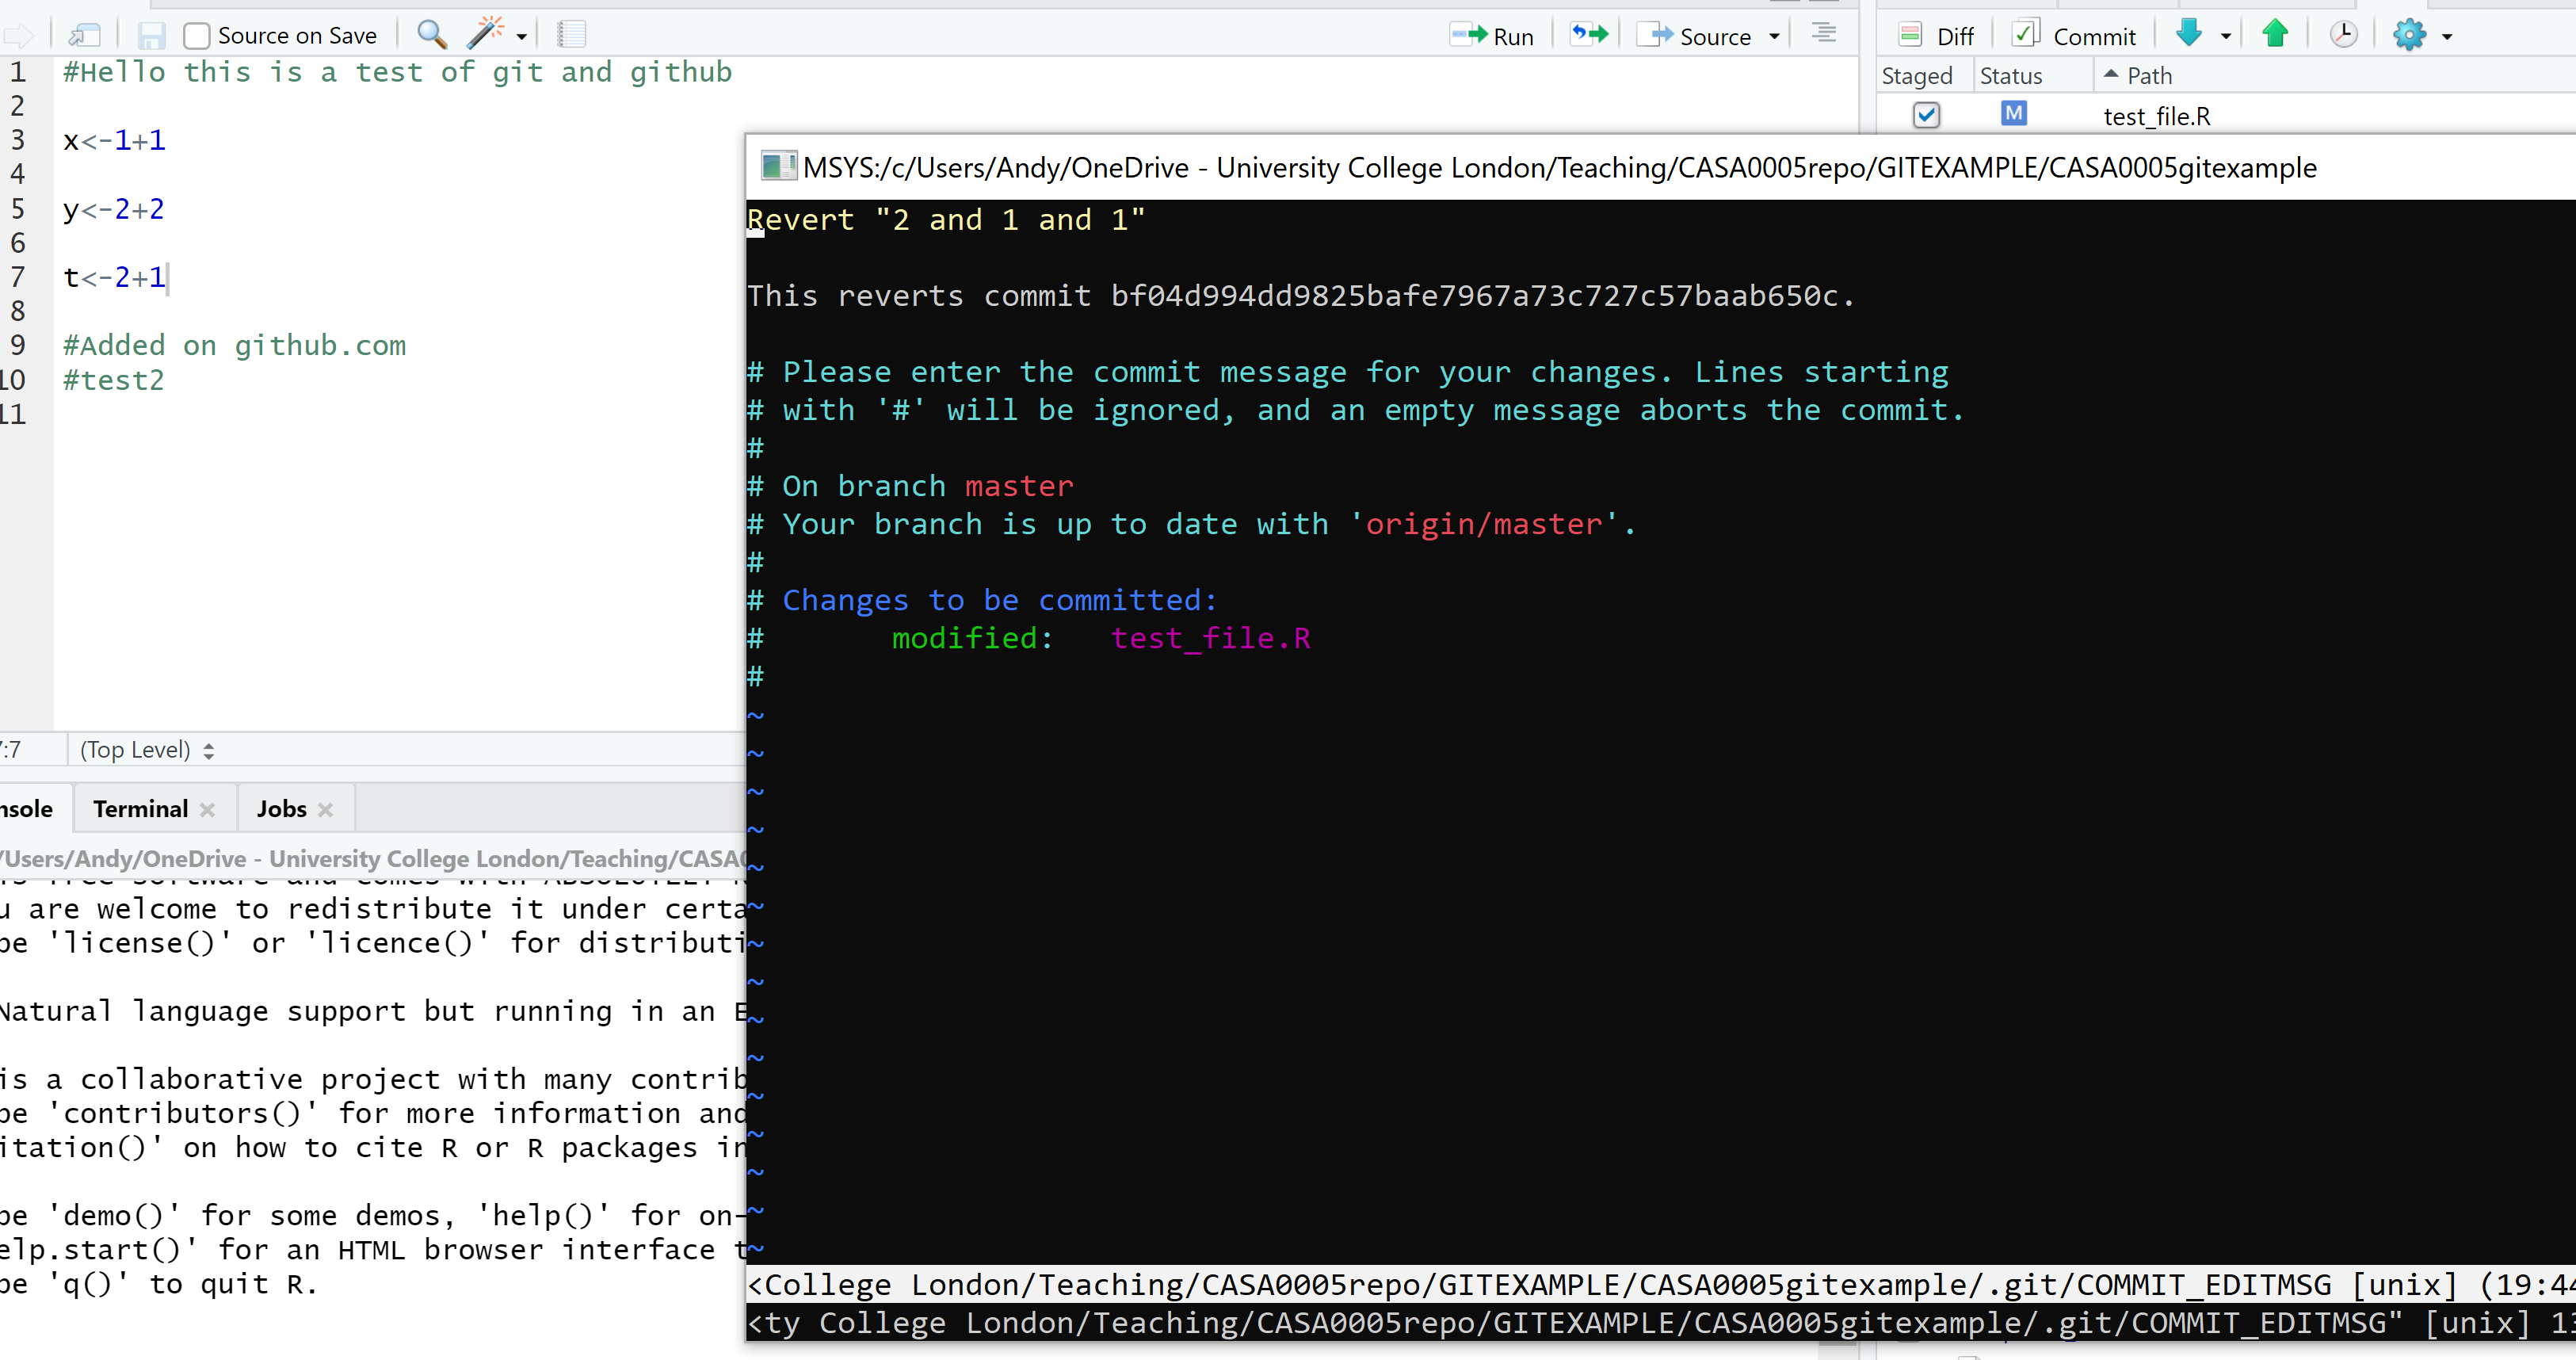
So modify z to t and assign it a value of 2+1. Phase the file, commit to git then now push to GitHub. Recall of this as case (a)
Simply wait…you missed off an extra i, t should be 2+one+1. Add the extra 1 commit to git and then now push to GitHub. Call up of this as case (b)
But look (again!)…more incoming news from direction…t is wrong, is should be assigned to only 2+one,….merely practise they not know we've already pushed to GitHub several times!!
If nosotros use reset once we've pushed to GitHub it will rewrite the commit history and won't match with GitHub, so if yous tried to push to GitHub y'all volition get an error saying the tip of your local co-operative is behind the remote. This is because you have washed back in time locally. It will ask y'all to pull the changes from the remote. If you have reset, fabricated changes, tried to push, got an mistake, tried to pull — you will likely get a merge disharmonize message that you take to correct manually.
However, we tin can instead employ revert to maintain the history and avoid whatever conflicts — revert adds a new commit at then stop of the 'chain' of commits. In our example (b) is the current head, it volition add a new commit that is our original (a) to the stop of the chain. On the other hand reset will move your local main (or other branch) back in the concatenation of commits, but if you moved your local git back whilst your remote (GitHub) remains further forth the chain this volition cause an fault and merge conflicts!
To employ git revert y'all accept ii options either just: git revert HEAD or git revert [input commit ID] - but only go the commit ID for the latest commit nothing before information technology! Every commit y'all make will have an ID (chosen an SHA). To see the SHA simply go to Diff (in the Git tab) > History (top left of the review changes window) — annotation down your SHA and use it in the shell control.
Ok, then to use revert go to the beat and enter git revert HEAD
You will probably exist met with the VIM (or viewport) window. The all-time form of action is to input :q to quit and accept the default commit message. You will see already that my test_file.R has already been placed back in the Git tab and t<-2+1 again.
If you really want to change the commit message then yous need to get into insert mode by typing i > change text > exit the insert mode with Ctrl+C and then > :q to quit. Thanks to the article by Melanie Frazier for this information.
If you are storing your R project in a folder that is synchronises online (e.g. OneDrive) you might have issues with this. When you use revert git locks a file which mean information technology can't synchronise, if you effort and practice some other revert git will not know who yous are. It looks like the procedure of reverting nonetheless happens, but just be conscientious!
Also if you desire to get back several commits as opposed to simply one you lot must write the code as git revert Head HEAD~1 HEAD~2 so on. Remember HEAD is the last commit you sent to Github, Head~1 the one before etc.
Yous could likewise specify this as git revert HEAD~2..HEAD, where i think it's possible to replace HEAD~2 with a commit ID.
Boris Serebrov explains more advance usage of revert very well.
One final play a joke on
What if you wanted to become back in time and restart from that point. Of course you could use revert. Nonetheless another possible manner is to play a trick on GitHub past combining git reset --hard and git reset --soft. First practice a hard reset to using the commit ID you want to go back to…
-
git reset --hard commit ID
Then do a soft reset to flim-flam git to moving the pointer back to the end (or back to head), which is what the remote is expecting
-
git reset --soft HEAD@{i}
Then commit git commit -m "going back to ten commit (or with the commit push button) and button git button (or with the button).
Git commands
If you lot'd rather utilize shell to control Git and then you can. If you lot have a big project RStudio sometimes has limits on filename length (eastward.g. this might occur with a volume, similar this one). To get around this you tin can use the post-obit commands:
-
git add .to stage all files -
git commit -thou "commit comment"to commit all the staged files -
git pushto push the commited files to the remote
RMarkdown
OK, so now you have gear up everything upward and then that y'all tin can go a reproducible enquiry ninja! All that remains is to exercise some reproducible research!
For the definitive guide on R Markdown, please read R Markdown: The Definitive Guide — obviously! It will tell you lot everything you need to know, far across what I am telling y'all here.
The RMarkdown for scientists workshop past Nicholas Tierney is a actually quick guide for how to use information technology for reproducible science.
There is also an fantabulous guide on the R Studio website
And a quick cheatsheet here
And an older one here
This video is also pretty practiced at explaining the benefits of RMarkdown
R Markdown is awesome as you can evidence code, explanations and results within the same certificate!!!! Oft it could exist very hard to reproduce results attributable to a lack of data in the methodology / userguides or walkthrougts not matching upwards with the latest version of software. Recollect back to a fourth dimension where you had to use software and consult a massive userguide in how to utilize it…for me it was a very painful feel. R Markdown is a large improvement as it puts all of the information in the aforementioned document, which can then be convereted into a range of unlike formats — html for webpages, word documents, PDFs, blogs, books — virtually everything!
It's also not limited to R lawmaking!!! To change the code language all you have to practise is edit what is between the {} in a lawmaking chunk (we embrace in point 36). In R past default you become {r}, put for python y'all just change this to {python}!!! COOL. You've also got to have all the python software installed and the R reticulate() package as well.. have a look hither for more information.
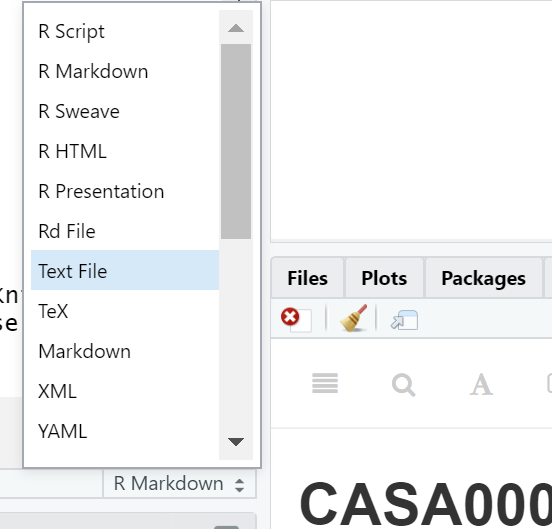
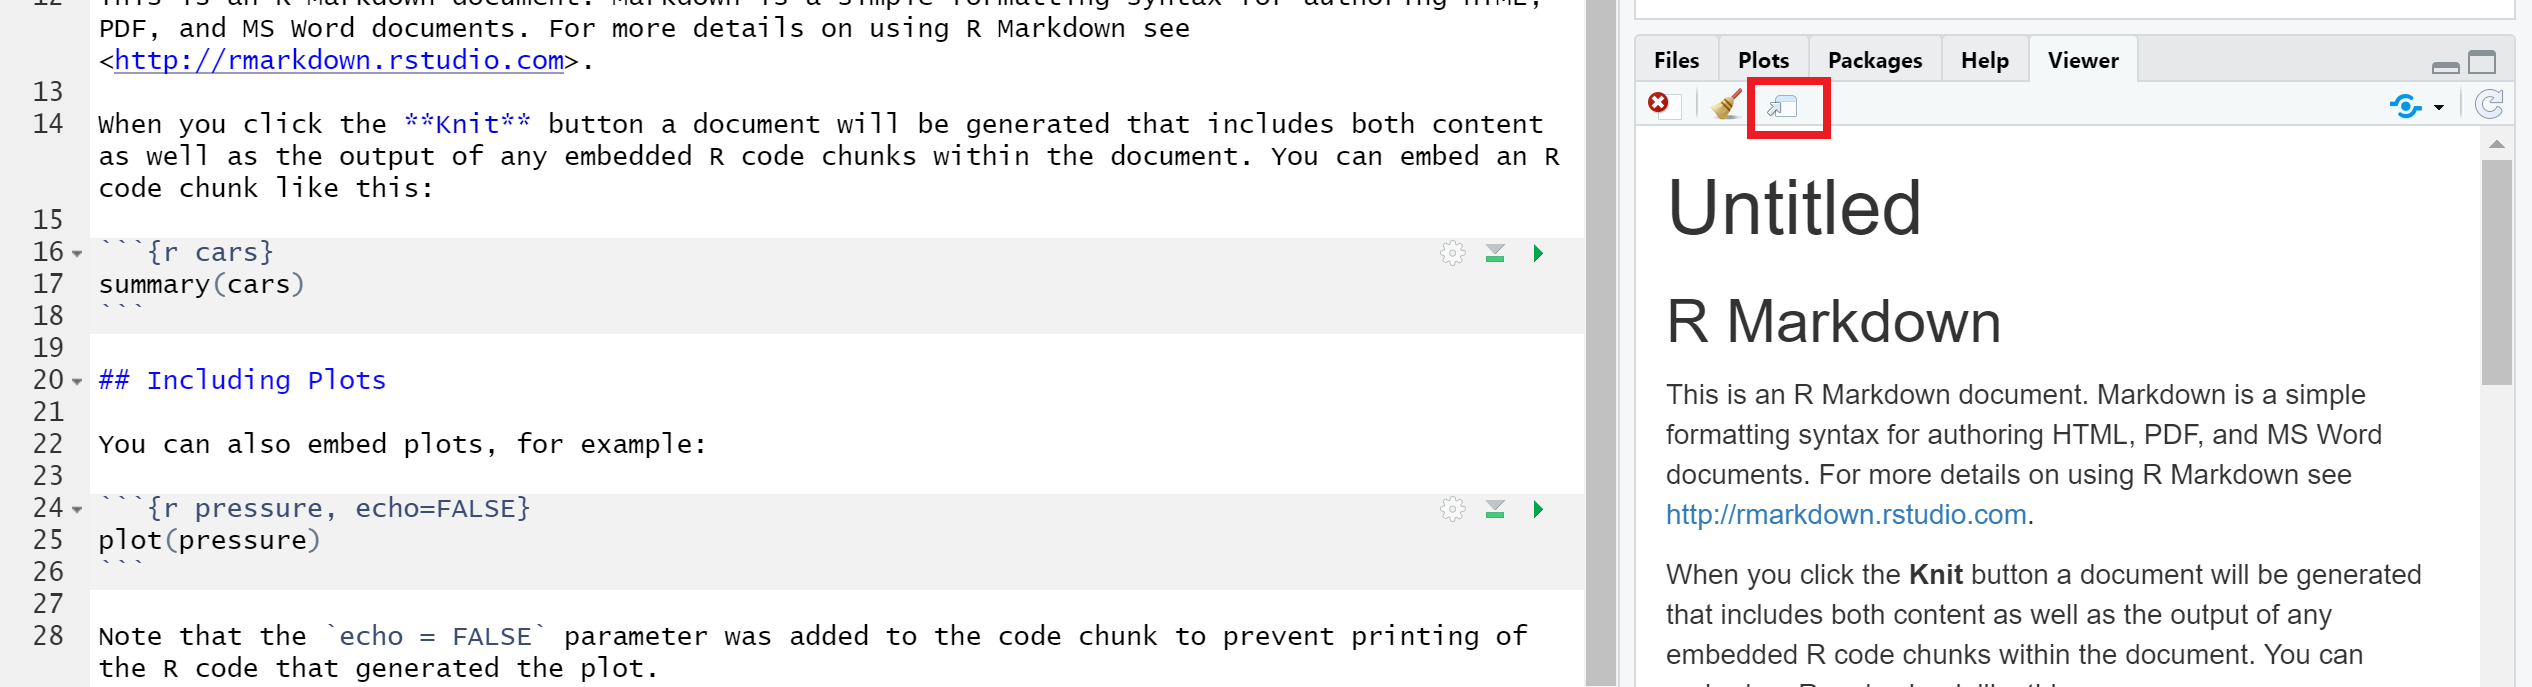
Now, earlier on in this exercise, I got you to open a new R Script. You now need to open a new R Markdown certificate, you could also select an R Notebook…They are both RMarkdown documents, the notebook originally permit y'all run code chunks that could be executed independently, yet you can also now do this if you select a markdown file. To my noesis the only difference is that a R Notebook adds output: html_notebook in the output option in the header of the file that adds a Preview button in the tool bar. If y'all don't have this so the preview option will be replaced with Knit.
![]()
But you lot can mix the output options in your header for the file to go the Preview button back if you wish to. Basically, there isn't much deviation and you tin manually change it with one line of code. Accept a await at this stackoverflow question for more infomation. For ease i'd just stick with R Markdown files
There are two ways to create an RMarkdown document
-
File > New File > R Markdown
-
You tin change the blazon in the bottom right corner of the script window….
I ever use style no.ane (so use that hither) and this will be populated with some case data, click Knit to come across what information technology does…the file should load in the viewer pane, if you click the arrow and browser button it volition open in an cyberspace browser..
HTML
-
We are now going to insert some code from the practical last week into the new R Markdown certificate …clear all of the code except the stuff between the —
-
In RStudio, you can either select Code > Insert Clamper or you lot can Click the 'Insert' push and insert an R chunk
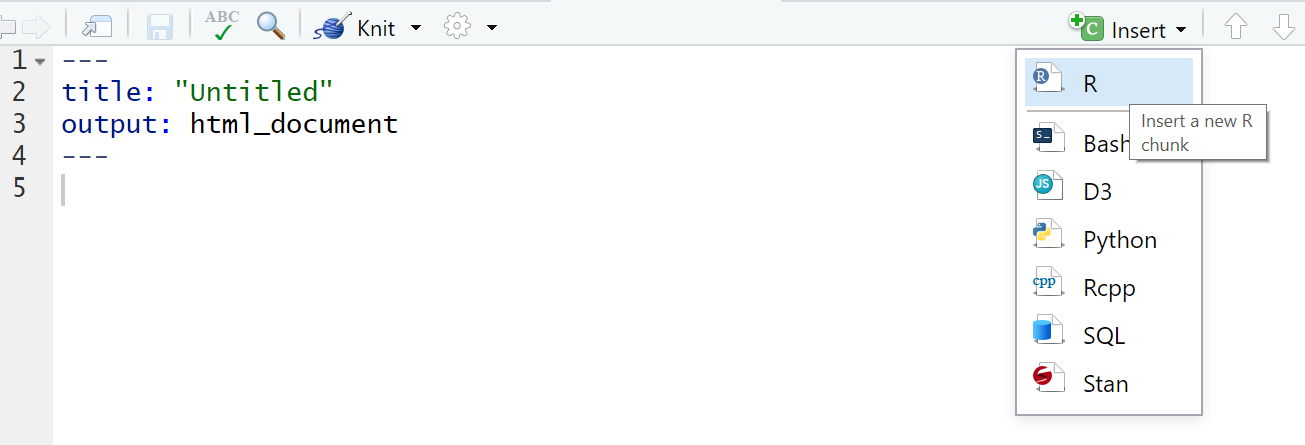
- A box volition appear and in this box, you will be able to enter and run your R code. Attempt pasting in:
library(raster) library(here) jan<- raster(here("prac3_data", "wc2.0_5m_tavg_01.tif")) # have a expect at the raster layer jan plot(jan) 
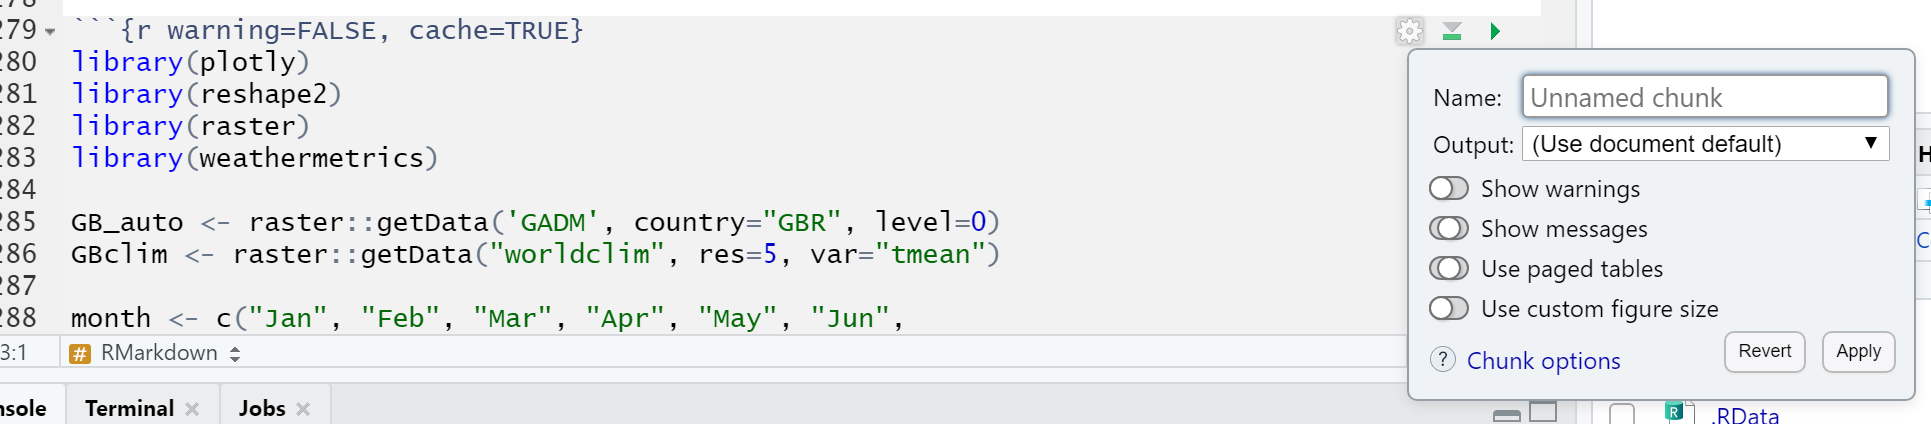
When including code chunks in your piece of work, at that place are various options that allow y'all to do things similar include the lawmaking, but non run it: brandish the output but non the code, hibernate warnings etc. Almost of these can be input automatically by clicking the cog icon in the acme-correct of the chunk, or you tin specify them in the code header of the chunk…if y'all toggle the buttons y'all'll see the code modify in the chunk 'header'. There are likewise 2 useful icons to the right of the settings cog, the beginning will run all code above the current chunck (play symbol facing down) and the 2nd volition run the current code chunk (regular play symbol)
Shortcuts
This Twitter thread started past Nosotros are R-Ladies is one of the best resources i've found for shortcuts using RMarkdown. Favorites that will help you are:
New lawmaking clamper CTRL + ALT + i
New comment in code CTRL + SHIFT + c
Align lawmaking consistently CTRL+i
Fromant ugly lawmaking to nice looking lawmaking CTRL + ALT + A
Insert section label which is fold-able and navigable — this only works in a .R file not a .Rmd just is still useful CTRL + SHIFT + R
renv
Have you ever created an R script, come dorsum to it afterward and wonder why it's not working correctly? It's probably considering of bundle updates.
renv (pronounced R - env) tin capture the packages used in your projection and re-create your current library. You simply:
- Create a new project -
renv::init() - Create a snapshot -
renv::snapshot() - Telephone call the snapshot to load -
renv::restore()
The packet data and dependencies are stored in a renv.lock file.
When R loads a package it gets it from the library path, which is where the packages live. Sometimes there are two libraries a organization and a user library - use .libPaths(). The system library = the packages with R, the user library = packages you have installed.
When y'all load a package it loads the first case it comes across, user comes earlier system. To check - find.package("tidyverse")
All your projects use these paths! If yous load different packages and versions of them + dependencies. E.g.
- Projection 1 used
sfversion 0.9-eight - Project 2 used
sfversion 0.9-half-dozen
Switching between projects would mean you have the wrong version as they employ the same libraries.
renv - each projection gets it's own library! Projection local libraries.
When you apply renv::init() the library path will be changed to a project local one.
Information technology volition create a lock file that holds all the package information.
To re-create my environment once you have forked and pulled this repository you would use renv::restore(). Of class some projects use the aforementioned package version — such as tidyverse, renv has a global cache of all the libraries. And then there is a massive database of your libraries then each projection library links it from at that place, meaning you lot don't accept 10 versions of the same tidyverse.
Further reading
Since starting this little guide, I accept come up across the book Happy Git and GitHub for the useR on, well, using R and GitHub by Jenny Bryan and Jim Hester. It'due south bright — become involved!
…Too the GitHub guide
Feedback
Was annihilation that nosotros explained unclear this week or was something really clear…allow us know using the feedback form. It's bearding and we'll use the responses to articulate any issues upward in the future / conform the material.
huddlestonmempity.blogspot.com
Source: https://andrewmaclachlan.github.io/CASA0005repo/git-github-and-rmarkdown.html
0 Response to "How to Upload Already Run R Notebook on Github"
Post a Comment