How to Use Easy Transfer on Windows 10
Whether you plan to upgrade your Windows XP, Vista, 7 or 8 machine to Windows 10 or buy a new PC with Windows 10 pre-installed, you can use Windows Easy Transfer to copy all your files and settings from your old machine or old version of Windows to your new machine running Windows 10. In this article, I'll walk you through the steps to configure Windows Easy Transfer.
Before we get started, let me clarify exactly what you can transfer using Windows Easy Transfer:
– User Accounts
– Documents
– Videos
– Music
– Pictures
– Browser Favorties
It will not transfer over the programs. You will have to reinstall any programs that you want on your new Windows 10 PC.
Windows Easy Transfer on Windows 10
Before we get started, there is one big issue we have to deal with. Microsoft has removed Windows Easy Transfer from Windows 10 and now suggests some third-party program PCmover Express, which costs money! There is no way I'm paying any money just to transfer some data from one PC to another.
Luckily, there is a way to get around this problem. Basically, the Windows Easy Transfer program is already installed on Windows 7 and Windows 8. If you are using Windows XP or Vista, you can download the appropriate version from here:
Windows XP Easy Transfer – https://www.microsoft.com/en-us/download/details.aspx?id=7349
Windows Vista Easy Transfer – https://www.microsoft.com/en-us/download/details.aspx?id=14179
Now, if you try to download the Vista version and run it on Windows 10, it gives you an error. However, if you have a Windows 7 64-bit machine, you can copy over the folder that contains the Windows Easy Transfer program to a USB stick and then run it on Windows 10 and it works just fine.
If you do not have access to a Windows 7 64-bit machine, I copied the folder and zipped it up, which you can download from here. If you have 32-bit Windows 7, run the preinstalled 32-bit version on the Windows 7 machine, but download the 64-bit version on Windows 10. It can import a 32-bit version of an Easy Transfer file. Simply uncompress the folder and run migwiz.exe.
Run WET on Old Computer
To get started, you need to open Windows Easy Transfer on your old PC or the PC that is running Windows XP, Vista, 7 or 8. Note that if you are doing an upgrade, think of the old machine as the old version of Windows, in this case Windows XP, Vista, or 7.
Also, note that if you are upgrading Windows XP or Vista, you will need to download and install Windows Easy Transfer as it does not come with the program built-in. If you are running Windows 7 or 8, it's already there and you can just search for it. The download links are above.
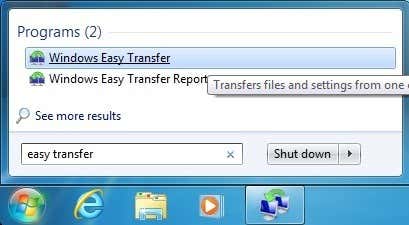
Note that it says it's for transferring from XP or Vista to Windows 7, but you can use it to transfer to Windows 8 also. In Windows 7, just search for Easy Transfer and you'll see it show up:
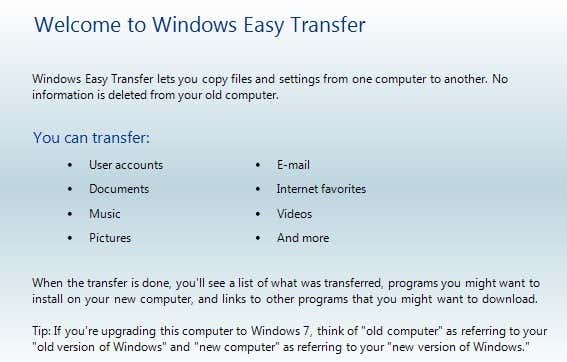
To start, we will open Easy Transfer on the old machine, in my case Windows 7. Once you start it, the Welcome dialog will pop up and give you an overview of what items you can transfer:
Click Next and then choose the method you want to use to transfer between the old PC and Windows 8. You can choose from Easy Transfer Cable, a Network, or an external hard disk or USB flash drive:
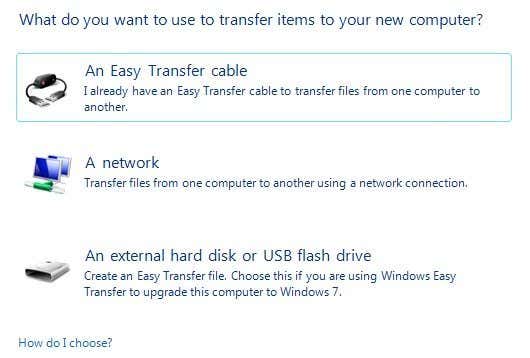
If you are upgrading a computer to Windows 10, then you can choose external hard disk or USB flash drive since the old and the new computer is actually the same computer. You'll, of course, have to have a external drive or USB flash drive in order to do this.
If you're transferring between two computers, then the best option is a network connection since you probably have the computers on the same wireless home network. If you don't have any network setup at home, then you can use an Easy Transfer Cable, which is a special cable you have to buy. Here is a list from Amazon:
http://www.amazon.com/Easy-Transfer-Cables/lm/R3G7LKPRYOEDL
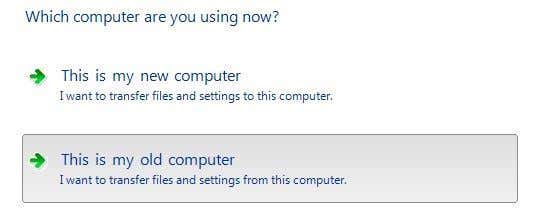
In this article, I'll go through the network method since that is what most people will be using. If you are transferring to Windows 10, then choose the USB method instead. Click on A network and choose whether this is the old or the new computer. In our case, we are starting with the old computer, so click on This is my old computer.
On the next screen, you'll see some instructions and you'll see a Windows Easy Transfer key. You will need to use this key on the new computer.
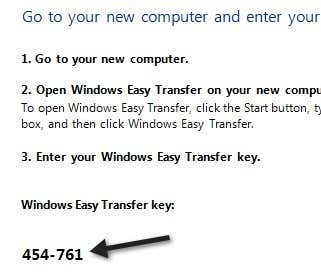
Now go to your new Windows machine and start the Windows Easy Transfer wizard. You can open it in Windows 8 by going to the Start screen and then right-clicking anywhere until you see All apps at the bottom right. Then scroll to the right and you'll see it under Windows System.
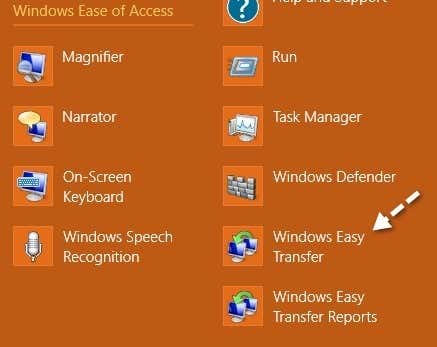
In Windows 10, you'll need to either download the Windows 7 64-bit WET in the link I have above or you can do it yourself by going to the following folder on your Windows 7 PC:
C:\Windows\System32\
Find the migwiz folder and copy it to a USB flash drive or to the cloud, etc. However you do it, just copy that entire folder to your Windows 10 PC and then double-click on migwiz.exe.
Now follow the same steps as above: click Next on the welcome screen, choose a network for how you want to transfer, and then choose This is my new PC. On the next screen, you have to tell Windows whether you installed Easy Transfer or if you're running Windows 7, in which case it's already installed.
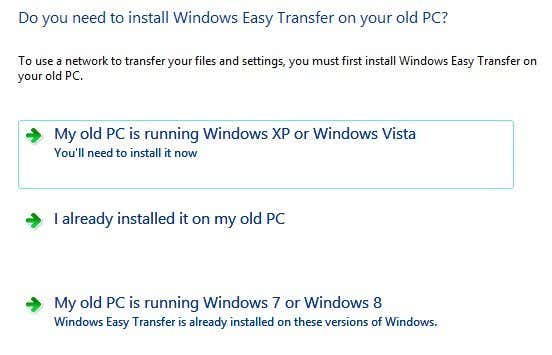
In my case, I am transferring from Windows 7, so I chose My old PC is running Windows 7 or Windows 8. Click Next. You'll get the instructions to go to your old PC and get the key, which we already did. Click Next again.
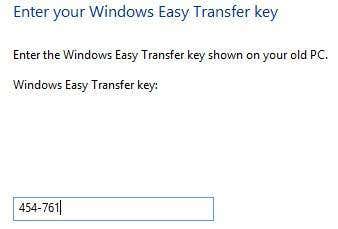
Now go ahead and type in the key that you got from your old computer and click Next. The program will download any updates to the Easy Transfer program first:

Once it has done that, it will scan the user accounts on the old computer (which takes a few minutes) and tell you exactly how many MBs worth of data will be transferred:
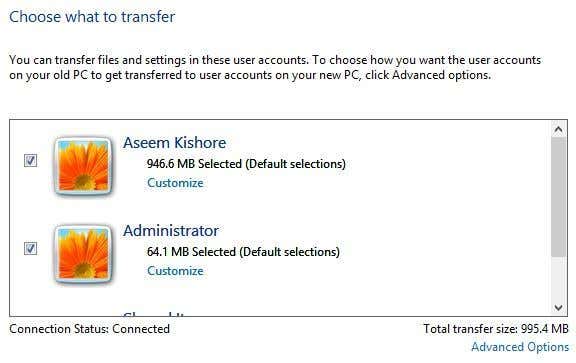
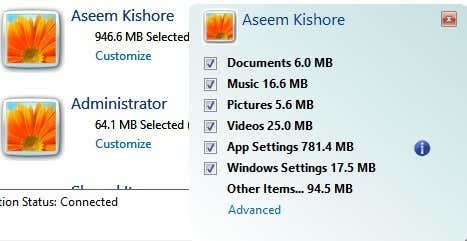
You can click on the Customize link to see exactly how big each folder will be and you can uncheck specific folders if you don't want to transfer everything like Music or Videos, etc. If you click on the Advanced link here, you will get an Explorer dialog where you can check and uncheck specific folders under each of the main folders.
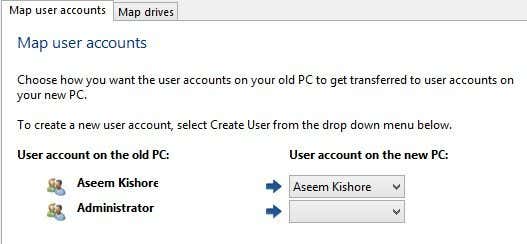
If you click on Advanced Options, you can change how the mapping of the user accounts will occur. If the names of the accounts on both computers are the same, it will automatically link them, but you can change it here:
That's pretty much it. Click on Transfer and your files and settings will be transferred over! The most important thing here is the App Settings, which is really useful if you installed some heavy-duty programs on your computer like MS Office, customized them, and now have to reinstall them on Windows 10. If you transfer the settings using the Easy Transfer wizard, you can install the app on Windows 10 and retain all those settings and customizations. If you have any questions about the transfer process, post a comment here and I'll try to help. Enjoy!
Do not share my Personal Information.
huddlestonmempity.blogspot.com
Source: https://www.online-tech-tips.com/windows-10/transfer-files-from-windows-xp-vista-7-8-to-windows-10-using-windows-easy-transfer/
0 Response to "How to Use Easy Transfer on Windows 10"
Post a Comment